Sunday, March 8, 2015

Wedding Bells, Babies, Babies and More Babies!

Hello Journey friends,

I'm here to share a much happier post today.  There are a lot of baby births and weddings happening soon at my school (I'm a teacher) and I'm the designated cardmaker.  So this weekend, I'm taking advantage of my free time to make some cards.  Two baby showers this Thursday and a wedding shower soon.  Wahoo!

You know, the more I look at this card, I don't think it fits the personality of any of the recipients...but I DO know who it will be mailed to...A special Florida girl who is having her first baby in about four weeks.  She's doing her room all up in pink, black and grays...with lots of girly touches.  I think this'll be perfect!

So I guess I'm back to the drawing board for my fellow teachers..ha ha ha.

Card Ingredients:
CS 0040 Whip Cream Cardstock
CS 0003 Black Licorice Cardstock
PP 0002 Black and White patterned paper
IP 0029 FSJ Sweet Berry Ink
IP 0041 Black Licorice Ink
AT 0084 Damask Print ATS
SS 0052 Little Big Greetings
AC 0067 Clear Bloom Accents
AC 0103 Photo Pin Elements
AC 0022 Sparkle Drops
AC 0004 Black Licorice Journey Twine
AD 0002 Journey Glaze
AC 0013 Journey Sparkle Dust
HugSnug Brand Black Seam Binding

Friday, March 6, 2015

You Lift Me Up and Make me Smile!


This week's Make-Live-Share involves creating a project that combines my joy of using stamps in unconventional ways and my love of creating "collections".  I also wanted to incorporate my March Sketch Challenge over at CreativeBloomsJourney.  In this challenge, I required a scalloped border in the layout design.  Since I didn't have a scallop long enough, I knew I had to improvise...and then the fun began...

I thumbed through my stamps and spied a "round-ish" image that would possibly do the trick.  The "Lift Me" ATS worked perfectly for the scalloped border.  It kind of reminds me of bunting- so NOW I'm going to continue to use this idea for all sorts of cards!!!
I created this collection of six cards to fit specifically into this new Bamboo box.  I purchased several of these "organizational" boxes because I knew they would make great containers for cards, recipes and photos.
Now who is this for?

Well, I received word the other day that a retired teacher I worked with a few years ago lost her daughter to metastatic breast cancer.  So this is a gift for her... She returns to sub at the school often, and I can't imagine how much her heart aches.  Her daughter had been battling this cancer for five years and had a tremendous spirit and determination to fight and win.  Laura Elizabeth (Harbour) Scott leaves behind a loving husband, two young children (7 and 9), a sister, her mother and father and countless family members and friends who are blessed by the gifts she leaves behind.  Her legacy of giving and loving is immeasurable.  She co-founded a nonprofit called FamiliesFightingFlu and was passionate about the importance of vaccine-preventable diseases.  She will be so greatly missed.

Six perfect little cards to fit in the box and such a special person to give it to.  I hope they lift her spirits at this most difficult time.

#FSJSC2

Thursday, March 5, 2015

Let's Pretend...

Ok...So I'm chatting with friends about the new kit options (wink, wink) and preparing some "Let's Pretend" Fast Start options...

What an amazing set of kit options.  I think as an avid stamper who has every cutting tool known to man and most of the FSJ items in the Blooming Grand Kit, THIS kit is PERFECT!!!  Who doesn't love to shop for their OWN goodies???  :) :).


Later that evening....

So, there you go FRIEND!  What are you waiting for?  I shopped, I organized, and I planned your first order...HEE HEE HEE...

PS...If you want to join the Journey, pop over to my journey page and join my team!  www.funstampersjourney.com/401!  I'd love to have some friends on my team!!!

Wednesday, March 4, 2015

ALERT ALERT!

Hey stamping friends!

I wanted to pop on tonight as I just received a FABULOUS email from Richard and the Journey Crew...They've been working hard crafting some new Coach Kit options that might just be the PERFECT fit for you!!!

Check out the flyer!  Share with friends!  This is AMAZING!!!
Got a Grand Calibur already?  Option 1 and 2 might be perfect for you.  Already addicted to FSJ and have stamps, dies, paper, ink?  Kit 1 might be for you.  Don't have a thing and want IT ALL?  Kit # 3 is THE kit for you!!!

So, want to join the family?  Join my team!  This Friday these deals will officially begin!
www.funstampersjourney.com/401

Monday, March 2, 2015

Twinchie swap...

Hello Journey friends,

This month I participated in my first Fun Stampers Journey Coach swap hosted by Rose.  I signed up for the swap because it inspired me to create little 2x2 creations...Something I haven't made in YEARS!  What a fun throwback to my Stamp-Shack swapping days!  Brought back a lot of memories.  By now, I hope Rose has received my swap package and is busy sorting and sending off the packages!

Anyway, In creating the six twinchies, I decided I wanted to also create a Thank You card and some treats for Rose, because I know how time consuming it is to plan/host/organize incoming and outgoing swap projects.  I hope she enjoys the extra little treats I put in my package.

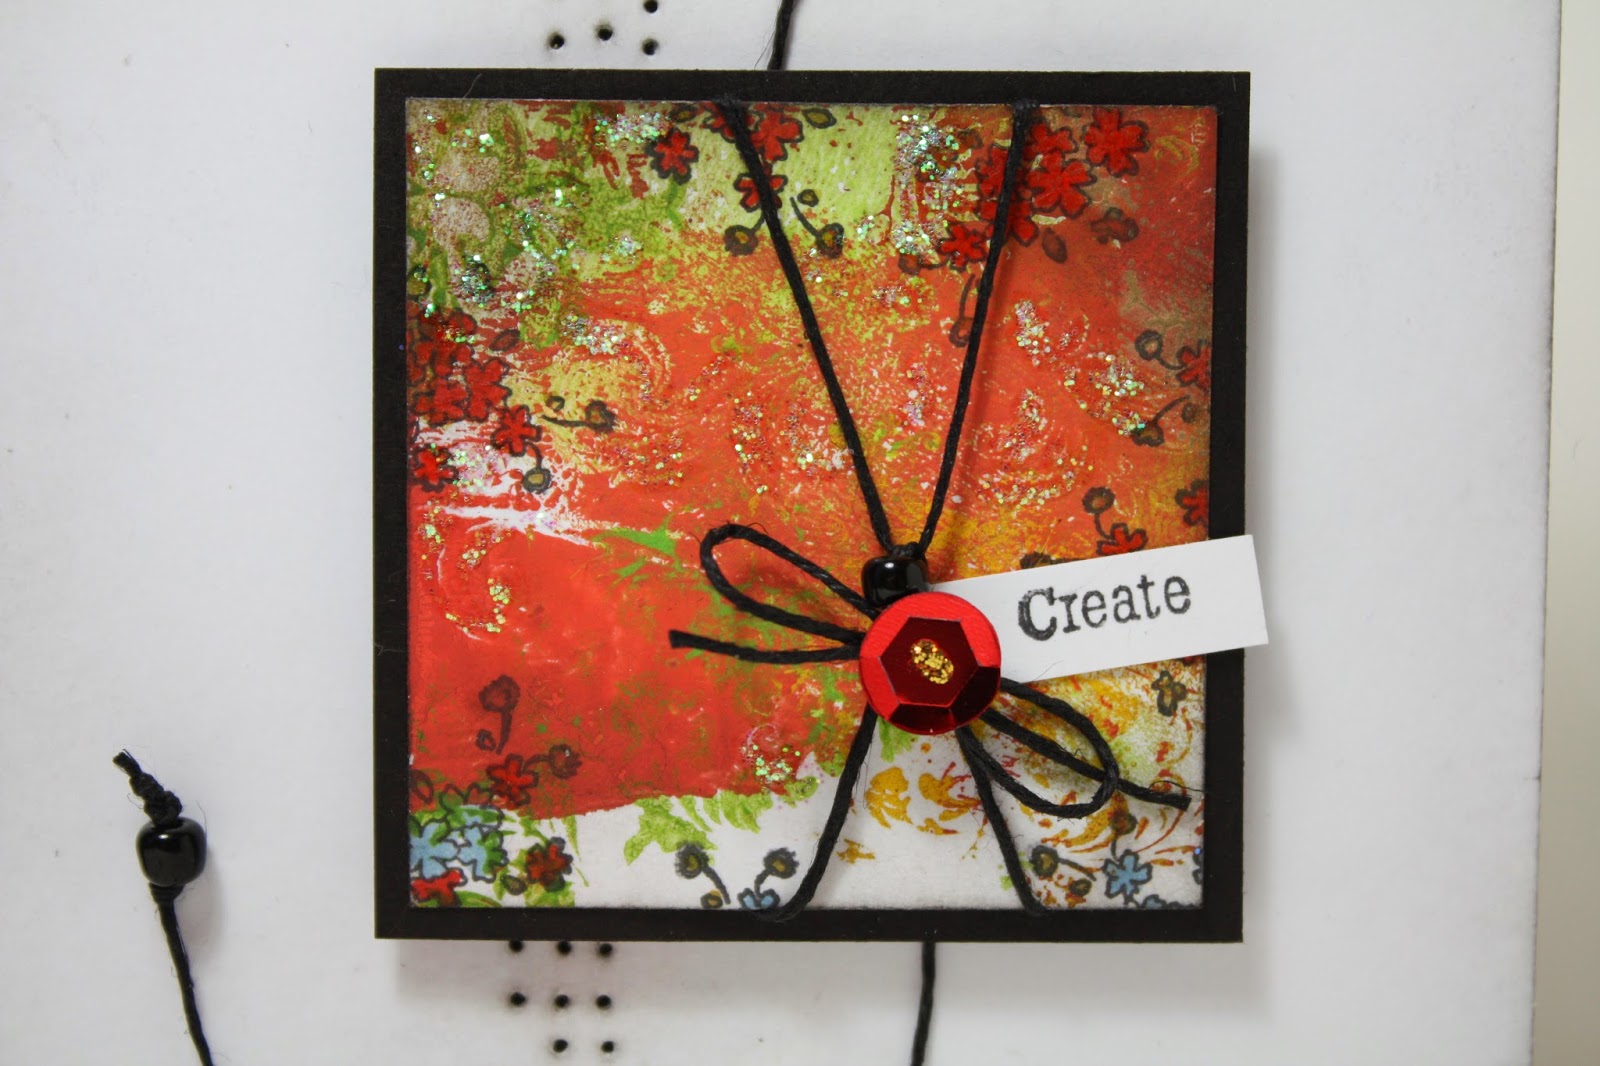
This project is a bit artsy I know.  I loved having the freedom to use my Gelli plate and acrylic paints (Coral, Lime Green and Tan) to make my own background paper pattern.  If you look close enough, you can see the Damask Print image floating on the image- I used the stamp to lift ink off of my Gelli plate.


After cutting the Gelli print paper out into the perfect 1 3/4 inch squares, I stamped over them using the little flower spray in the Banner Party set.  I tied up some Black Journey Twine onto the stamped panel, added a black seed bead and then mounted it onto a black 2x2 square.  I added a stamped sentiment from Bezel Blocks and a red sequin with  Gold Stickles.  I hand poked those little holes onto white cardstock then distressed a bit with a dry Versamark Pad (TIP- Don't toss that dry pad- it's a great distressing pad and adds just the perfect hint of black ink on your paper.)  Using a few pop dots to lift the twinchie off the card front, I applied some journey twine in an organic motion (with beads tied to the ends) then I adhered the twinchie so it would take center stage...
Here's a close-up of the twinchie design I created for this swap.  I created two extra twinchies so I could mount them onto cards...Yes, that's how I like to display my twinchies- as centerpieces on a card!
And what's on the inside?  A Thank You sentiment from the Thank You ATS set.

Want to see how my twinchies were packaged for the swap participant?  Well, here they are...Ready for their new homes!

Sunday, March 1, 2015

March Kit of the Month Is HERE!!!

Yipee!!! The wait is OVER!!! Today is the day we can spill the beans, toss the bottle, and let it float away...It'll have a fabulous journey!

Introducing the newest Kit of The Month:  
Wish in a Bottle!  
(original photo edited with permission from Richard Garay)
I'm sooo excited to get my kit in the mail!  I can't wait to fill those yummy bottles and play with texture!!! This will be an amazing kit to play with and I'm so looking forward to this bottle journey!!!
If you're interested in signing up for the Kit of the Month, please contact me or click the sidebar image to the right---->

Join me throughout the month for my adventures with this kit.  Grab some extra FREE inspiration sheets and get stamping!

Make-Live-Share Birthday Greetings!

I'm LOVING this Note pocket die!  I just got it in the mail the other day and I knew I was going to make a special card/gift for a fellow teacher/teammate who had a birthday this week.  I created this card for her so that it could accompany a gift card our team purchased.  It's tradition on our team to have cupcakes and give a little gift to celebrate a teammates special day.  

The pocket was the perfect little spot for a tag AND the gift card.   For this design, I selected paper from an old My Minds Eye 6x6 pattern paper pack that has been sitting on my craft table for months. I just love the oranges, greens and browns in the pack.   
As i LOVE flowers, I used the Flower Party dies to create some added dimension and flair to the card. Notice the little sparkle?  It's a Sparkle Drop...I'm loving them!  They are soooo sparkly!!!
Yummy and DELISH for sure!!!   To make sure the tag got some special attention too, I stamped it with a sentiment from the Birthday Sketch set and some Lemon Grass ink.  Yum!  I cut a little circle for the tab at the top, folded it in half and punched a hole.  Adding some matching ribbon and Journey Twine finished it off.  MMMMM.