Just popping in to share a cute card I created for my parents...While they galavant all over the globe, I work, work, work and wish, wish whish. They've earned their exploration wings and play dates in retirement and I'm happy they are able to take the many adventures they do.
Many, many more adventures to come!
I created this card using the "An Adventure" (stamp and die bundle, stamp only) stamp. Since I enjoy fussy cutting, I cut the submarine myself instead of using a die. I colored the submarine using a few gray Copic markers and blue markers. I also overlaid some Liquitex Silver Metallic ink on the colored image. It's a fabulous translucent metallic ink that creates a soft shimmer over colored images.
I stamped the World Map background stamp onto Beach Ball Cardstock using Beach Ball Ink. Then, I punched some holes into vellum with various hole punches in my collection (3/4 circle, 1 inch circle, 1 1/4 inch circle, Punch Handle). I assembled the card in my favorite wonky layout design onto a whip cream cardstock base. To finish the card off, I added a bit of Beach Breeze and Whip Cream thread to the edge.
I added a bit of Journey Glaze to the portholes and the little windows. I also attached the sentiment to the map panel using a staple.
Using Medium Foam Squares really help give this card life! When creating a layered card like mine, I think it's important to use varying layers- and dimensions...to achieve the full AHHHHMAZING effect!
Wednesday, September 7, 2016
Monday, September 5, 2016
A rose is not just a rose...
Hello Journey Friends,
Today's a special day! Today is my Momma's birthday!!!
Next, I tore a piece of vellum and rubbed a bit of Electric Lime ink onto it, then wrapped some natural thread around the vellum. I added it to the stamped layer in a collage fashion. The rose (Summer Rose) was created using Sour Lemon Splash and Limeade Splash and Kiwi Slice ink. I wanted a few yellow posies (yellow roses and flowers are my Mom's favorite) so I diecut some Spring Bloom Mini flowers and colored them with a DTP method using Bubble Gum and Banana Cream and Lemon Drop ink.
To finish off the card, I cut a small tag using the Tag Elements die set from Whip Cream cardstock and stamped it with the Happy Birthday sentiment from a retired set. I layered this panel onto Whip Cream cardstock then mounted onto a Lemon Drop card base.
Thanks for popping in to check out my Momma's birthday card! I hope she enjoys it!
Today's a special day! Today is my Momma's birthday!!!
She doesn't live near me anymore so it's sad I can't celebrate her birthday with her. So while she's having fun with my Dad and enjoying her free time in retirement, I sit here thinking of the time I'll be able to visit with them again...
I sure hope she has some fun times today! I decided to make a card for her that would incorporate some of our favorite things...music, flowers and....YELLOW! I hope she likes it!
To create this card, I stamped the Vintage Notes background onto Buttercream cardstock and onto Limeade Splash cardstock using a mix of Kiwi Slice, Limeade Splash and Electric Lime inks. After that, I rubbed a bit of Bubble Gum and Banana Cream ink onto the edges. I also splattered some Gold Silk, Electric Lime and Sour Lemon Silk onto both stamped layers. Next, I tore a piece of vellum and rubbed a bit of Electric Lime ink onto it, then wrapped some natural thread around the vellum. I added it to the stamped layer in a collage fashion. The rose (Summer Rose) was created using Sour Lemon Splash and Limeade Splash and Kiwi Slice ink. I wanted a few yellow posies (yellow roses and flowers are my Mom's favorite) so I diecut some Spring Bloom Mini flowers and colored them with a DTP method using Bubble Gum and Banana Cream and Lemon Drop ink.
To finish off the card, I cut a small tag using the Tag Elements die set from Whip Cream cardstock and stamped it with the Happy Birthday sentiment from a retired set. I layered this panel onto Whip Cream cardstock then mounted onto a Lemon Drop card base.
Thanks for popping in to check out my Momma's birthday card! I hope she enjoys it!
Happy Birthday!!!
Love you Mom!!!
Sunday, September 4, 2016
Sunday Sip and Share...It's PSL time!
Hello there coffee loving friends. Kerry here for another fun Sunday sip and share... and some exciting news! I know many of you are just as excited as I am for the almighty season of the PUMPKIN SPICE LATTE so I've got a treat for you today! Let's ring in the season with a spicy tribute to the delectable treat that is a welcome sign that FALL is on the way!!!
I started out by creating a yummy pumpkin spice-like spill (puddle smushing) on some Butter Cream Cardstock using a mix of Orange Rave Color Splash, Sour Lemon Color Splash and a few spritzes of water onto a plastic bag. After it dried, I stamped the Cozy Wishes mug using Pumpkin Bread True Fusion Ink. Once the background was finished, I glued it "wonky style" onto my Cocoa Powder cardstock and trimmed it to size.
I wanted to create a fun sentiment incorporating the Pumpkin Spice Latte theme and since I didn't have a specific PSL themed stamp (YET), I decided to create my own! I arranged the Marquee Type alpha stamps onto my acrylic block and selected the "wishes" sentiment from my Jolly Friends Stamp set. I stamped them onto a strip of vellum using Clear Pigment Ink and then applied Journey Gold Embossing Powder with my heat gun (ON SALE!)
I added a little heart embellishment strip of paper to break up the vellum strip a bit. It also allowed me to use some of my new yummy Amazing sequin trim that I picked up last week at the Be Amazing stamping event in Virginia Beach. I just punched the stamped heart with my hole punch (on sale now!, attached it to the paper strip using some Natural Journey Thread and tucked the trimmings in with the thread.
Just one last shot to show the shimmer on the card! I spritzed the background (and the sequin trim) with Shimmer Gold Color Splash. SO FABULOUS!!!
As you know, I work backwards…I create a sketch AFTER my card is finished…I love this wonky layout. If you love the layout too, please join us in creating something fun with the sketch as inspiration! When sharing your project, please include the hashtag #clcsipandshare on social media so we can access all the gorgeous creations in one place.
PS…. I soooo appreciated seeing the projects inspired by my sketches last month. I’m happy to say I have a little coffee-loving treat for one special coffee loving friend who created a card for EACH sketch last month!!! Sandi Pressley, I loved each one of your creations and appreciate that you took time to create projects inspired by each sketch in August. I’ll reach out to you on the FB group page so that I can send you your “prize”.
And WOO HOO!!! We’re excited to announce the upcoming Fall Coffee Lovers Bloghop! The hop will run from September 23-30 and we welcome YOU to join the fun! The hop will begin at 6:00 AM Pacific time and we encourage you to post your coffee/tea/cocoa loving cards and projects! As with every fabulous Coffee Lovers Hop, generous sponsors and blog hop participants will be contributing amazing prizes so you won’t want to miss out on the fun!
Monday, August 29, 2016
Be AMAZING Recap!
Hey Journey Friends! Today I'm sharing a HUGE photo recap of all the fun that was had at Be Amazing in Virginia Beach on August 26-27. If you like what you see, you'll definitely want to sign up for one of the last few events coming soon to Syracuse, NY in October and Orlando, FL in November!
So it all started with a training session on Friday. After the training session, a few lucky Coaches spent some time with Richard Garay filming some fun techniques for the Make-Live-Share movement. Vicki Soni and I were the lucky coaches this time! :) It was so fun! And you don't see it in this picture, but I was BRICK RED and shaky for quite some time...Thank goodness it took Dustin (aka Potato) a while to set up the equipment!
Prepped and ready for the shoot...All my goodies are laid out and ready!
Tip: Notice my water container? It's actually the container that held some Slice Fetti! These containers are perfect for transporting water...Save 'em, don't toss 'em!
Richard chatting with me about the technique...I'm layering, layering, layering the color.
Here's a closer look at the project I was demoing:
And then it was Vicki Soni's turn!
After lunch, it was time to create!
This was my favorite card. I didn't trim the sentiment panel and set it off wonky style again. I'm a wonky kinda gal, I guess! LOL
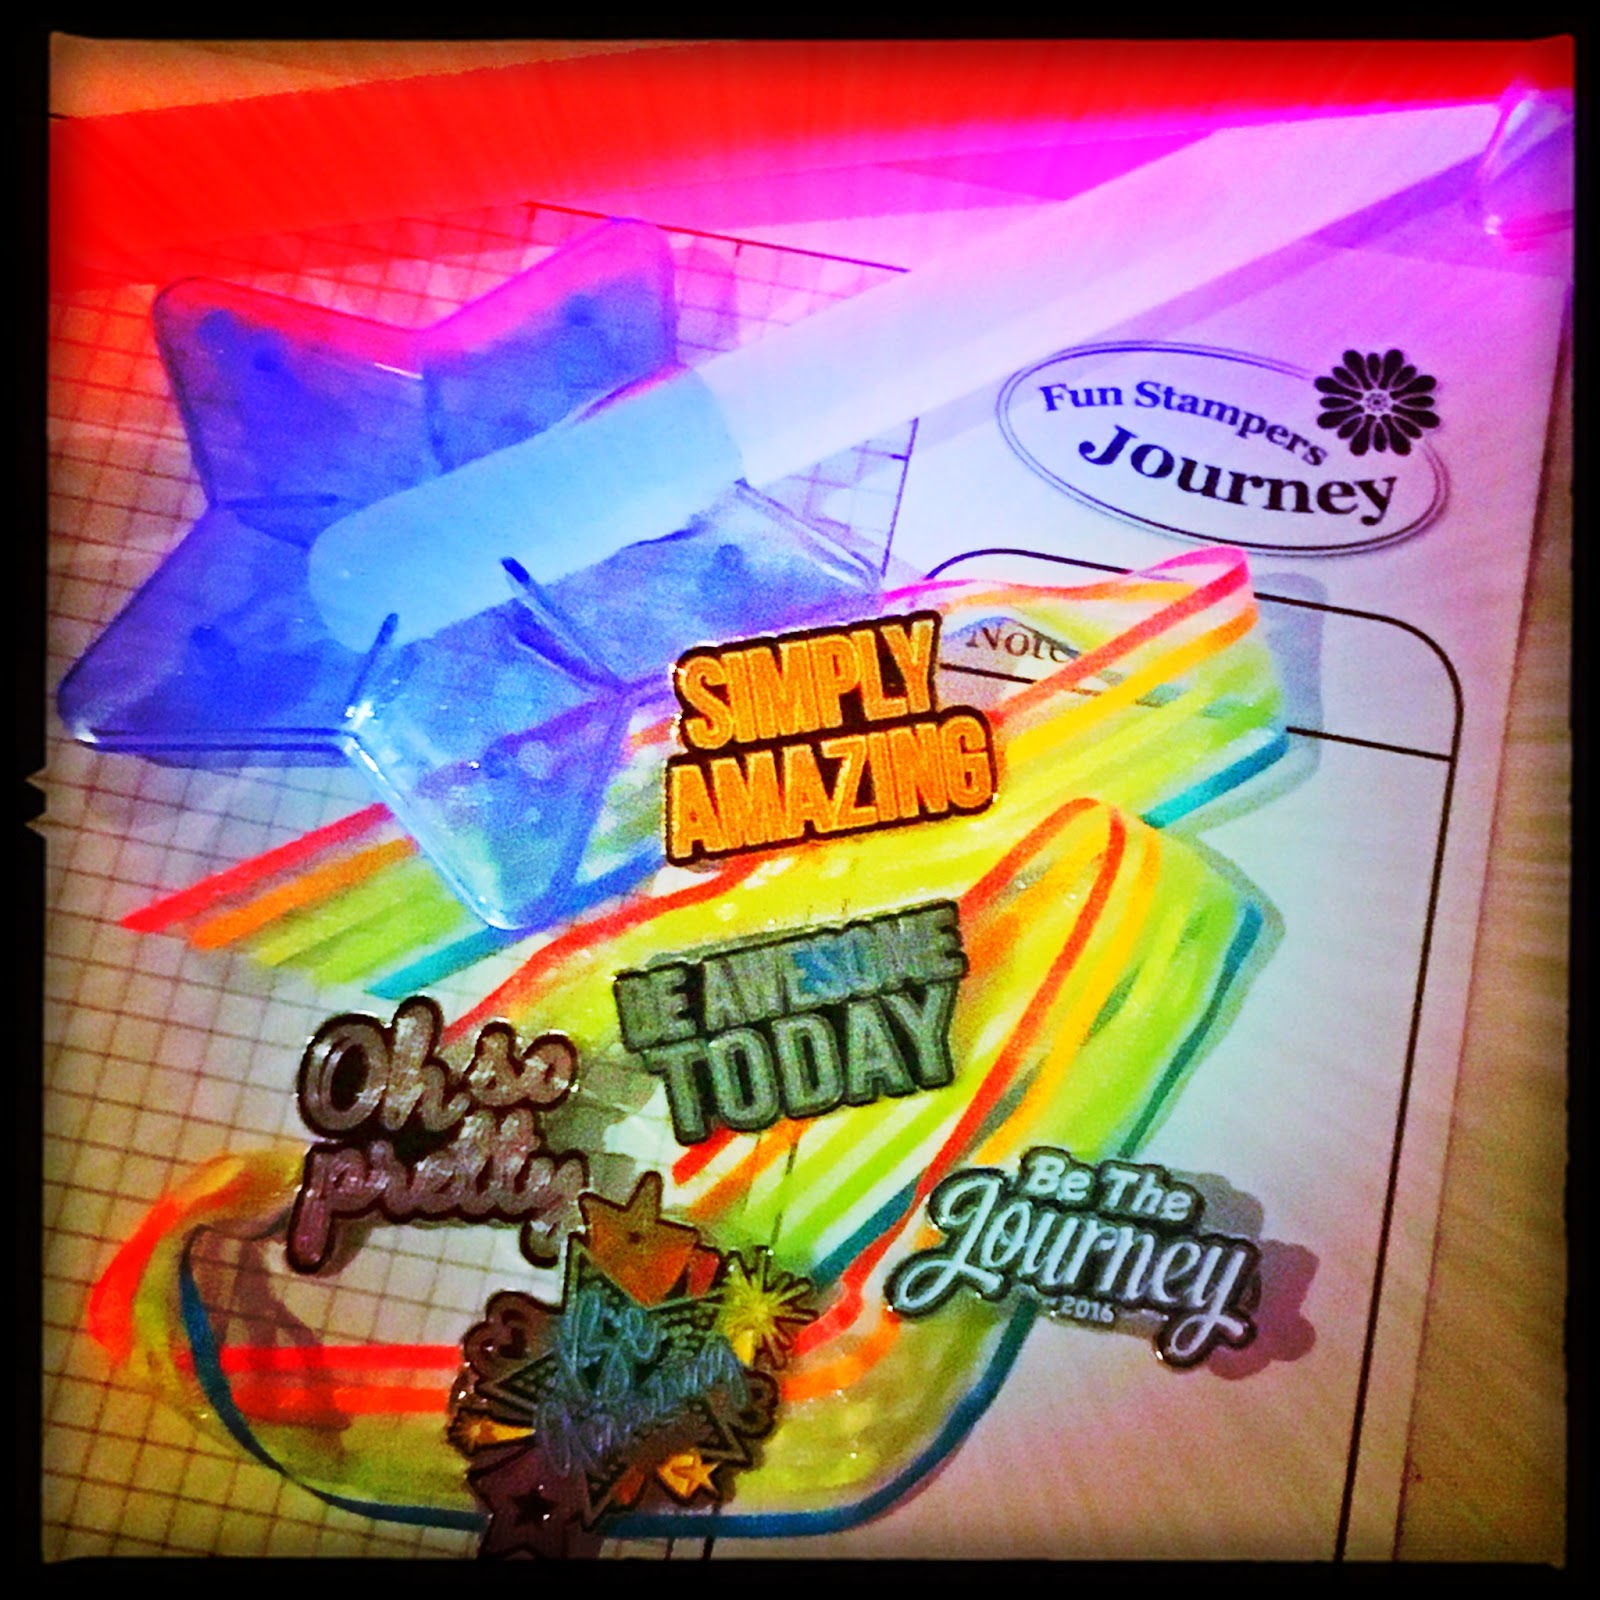
And YES! Richard always has a Social Media Challenge at our events. I love to play along and post away on Instagram...and WOO HOO!!! I WON! Check out the fab pins I took home:
So it all started with a training session on Friday. After the training session, a few lucky Coaches spent some time with Richard Garay filming some fun techniques for the Make-Live-Share movement. Vicki Soni and I were the lucky coaches this time! :) It was so fun! And you don't see it in this picture, but I was BRICK RED and shaky for quite some time...Thank goodness it took Dustin (aka Potato) a while to set up the equipment!
Prepped and ready for the shoot...All my goodies are laid out and ready!
Tip: Notice my water container? It's actually the container that held some Slice Fetti! These containers are perfect for transporting water...Save 'em, don't toss 'em!
Richard chatting with me about the technique...I'm layering, layering, layering the color.
Here's a closer look at the project I was demoing:
I also shared a few other projects on camera:
And then it was Vicki Soni's turn!
I stood and watched as Vicki shared her techniques. She's really good on camera! I took a few photos of her interacting with Richard too. It was pretty amazing that we had very similar techniques to share...and we didn't even plan it!
After our video shoot, it was time for opportunity night. This was a time for prospective coaches and new FSJ fans to come see some fabulous products demoed and learn about becoming a Fun Stampers Journey Coach.
Here's just one photo...Kim Kesti demoing the Pan Pastels and clear stamping. Other demos included the Press Punch system, the Journey Platinum Machine and Steel Rule Dies and our Journey Mixed Media products.
The next day was all about crafty fun and watching magic come alive! On Saturday Richard, Lynne, Kim and Gabby all shared TONS AND TONS of cardmaking projects on stage. Since I was positioned dead center, I was lucky to be rooting for both teams: Orange Rave (Nicole) and Turbo Teal (Dan). After demoing several cards, it was time for lunch and we had some free time to emboss our sentiments for our projects.
We were going to town with the heat guns!
Look at all those yummy neon colors! I definitely was in the FUN ZONE!
Since I can't do two things at once, It's always pretty hard to watch Richard speed through the tutorial and follow along- or read the directions and look and listen to him...Sooo..I took one glance at the final project and just got in my happy place and started creating! Some things are not quite exactly how they were shown, but I love my cards nonetheless. :)
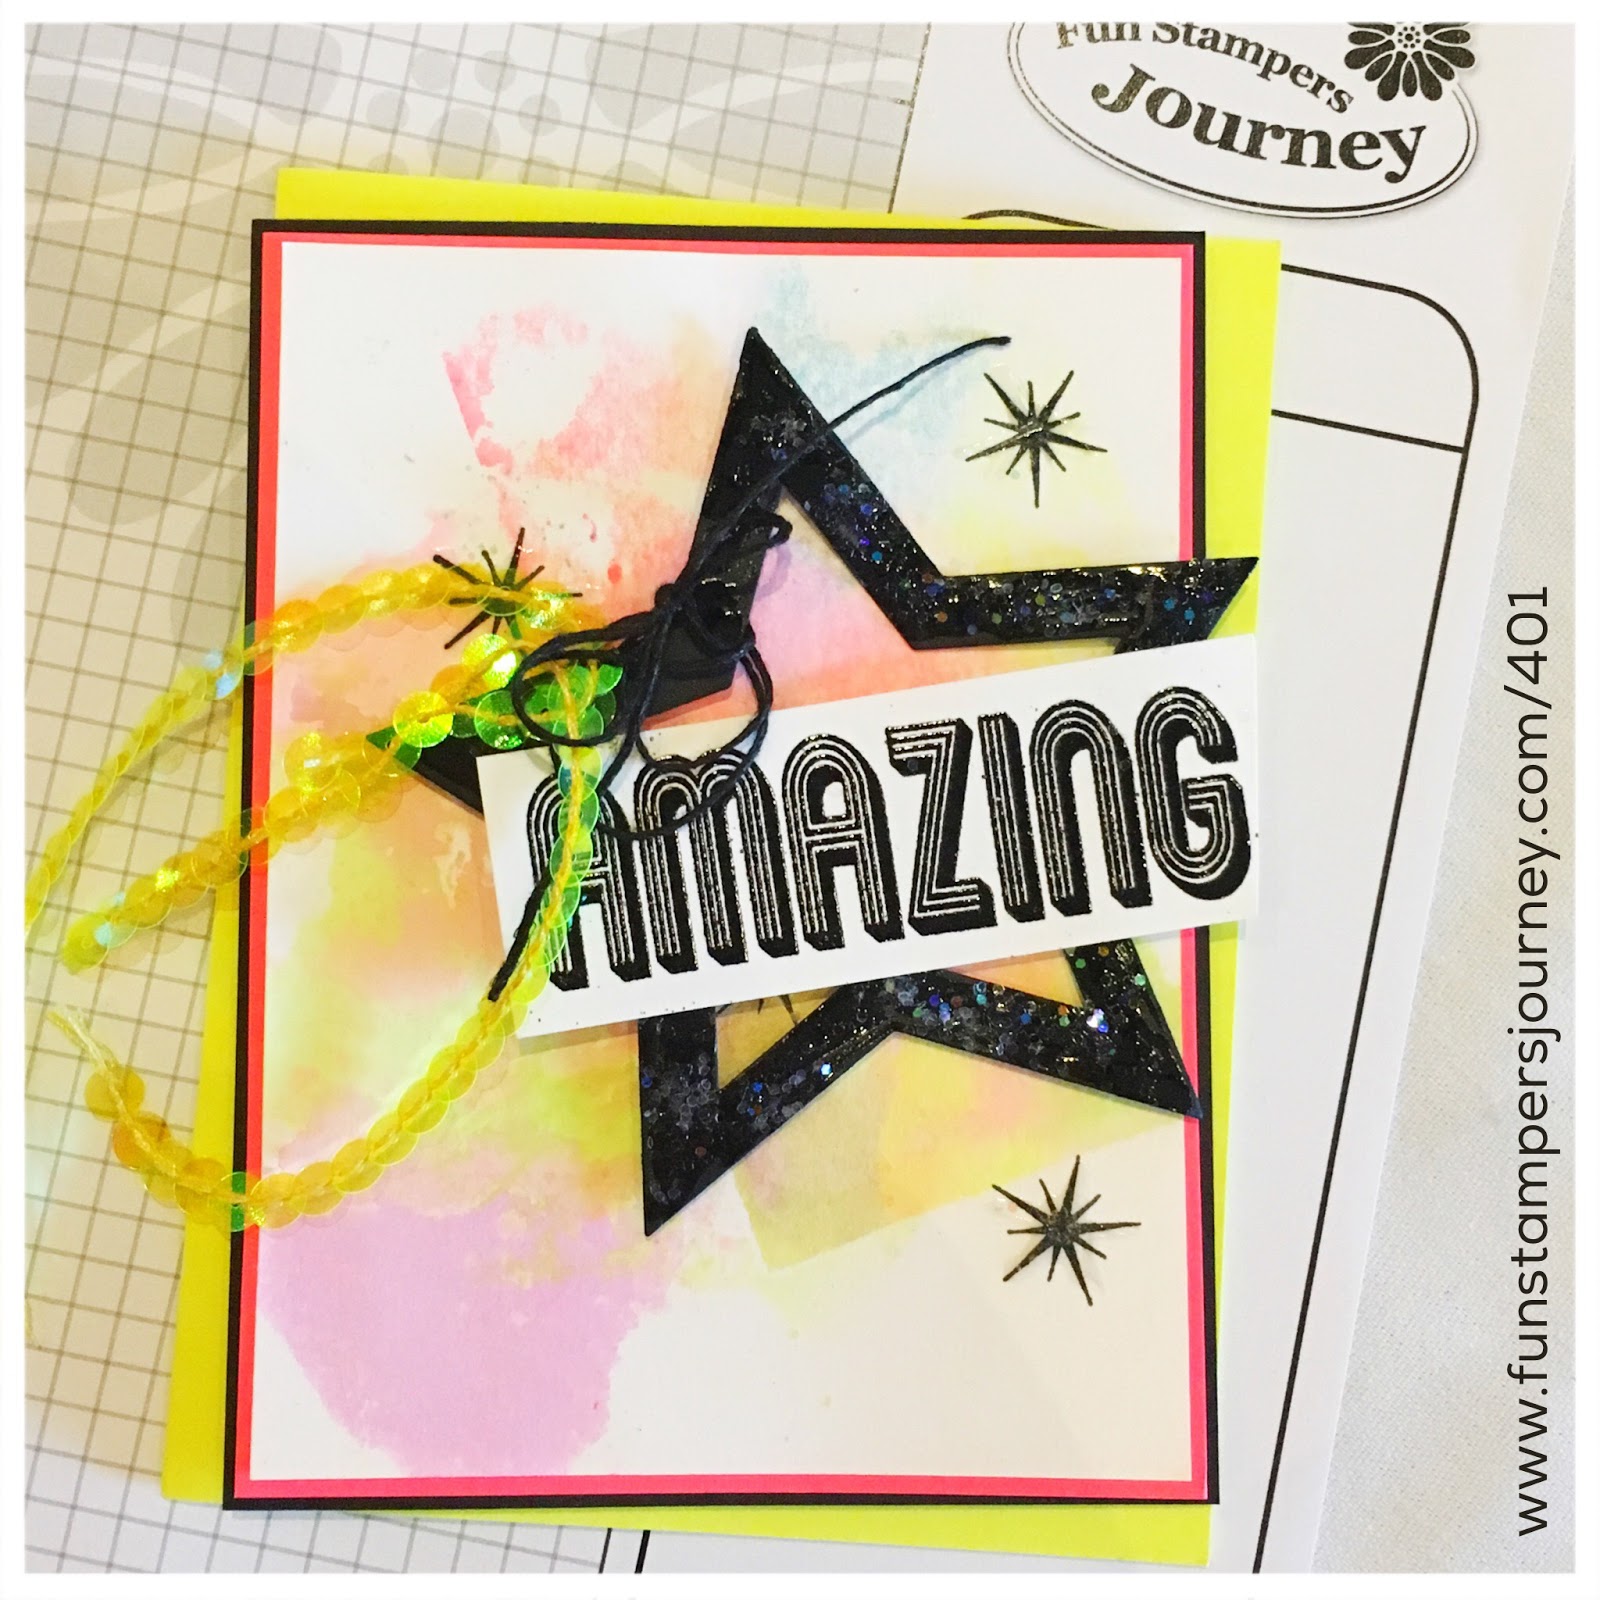
The first card involved me pre-embossing the sentiments and the stars. I didn't like the way the sentiment was embossed so I cut the letters out individually. I kinda like the mix of pennant and loose letters for the sentiment!
The second one involved a little smooshing! I love this fun technique and use it a lot at home. I added some more glitter to the star and stamped stars...and placed the panel wonky on the card base! This was my favorite card. I didn't trim the sentiment panel and set it off wonky style again. I'm a wonky kinda gal, I guess! LOL
This is the last card we made. I just about forgot to add the heart to the card- a stamper next to me discovered it loose on the table (drying)! I added some extra trim...Love the trim sooo Much! I want BLACK and WHITE!
It is fun to get cool pins at each event! It reminds me of my high school days when I traded pins with other students from all over the world who attended national convention.
Oh....And YOU KNOW there were freebies! Richard and the whole FSJ family are soooo generous! Just look at the FREEBIE LOOT we took home:
So yes, it was truly AMAZING! Such a fun time...You DON'T want to miss it!
Sunday, August 21, 2016
Sunday Sip and Share: Le Cafe'
Hello there coffee-loving friend! It's Kerry here with another Sunday Sip-and-Share at the Coffee Loving Cardmakers blog! I hope you've been enjoying my yummy Sunday creations over there and this week...I'm featuring YUMMY FSJ Products! WAHOO!!!
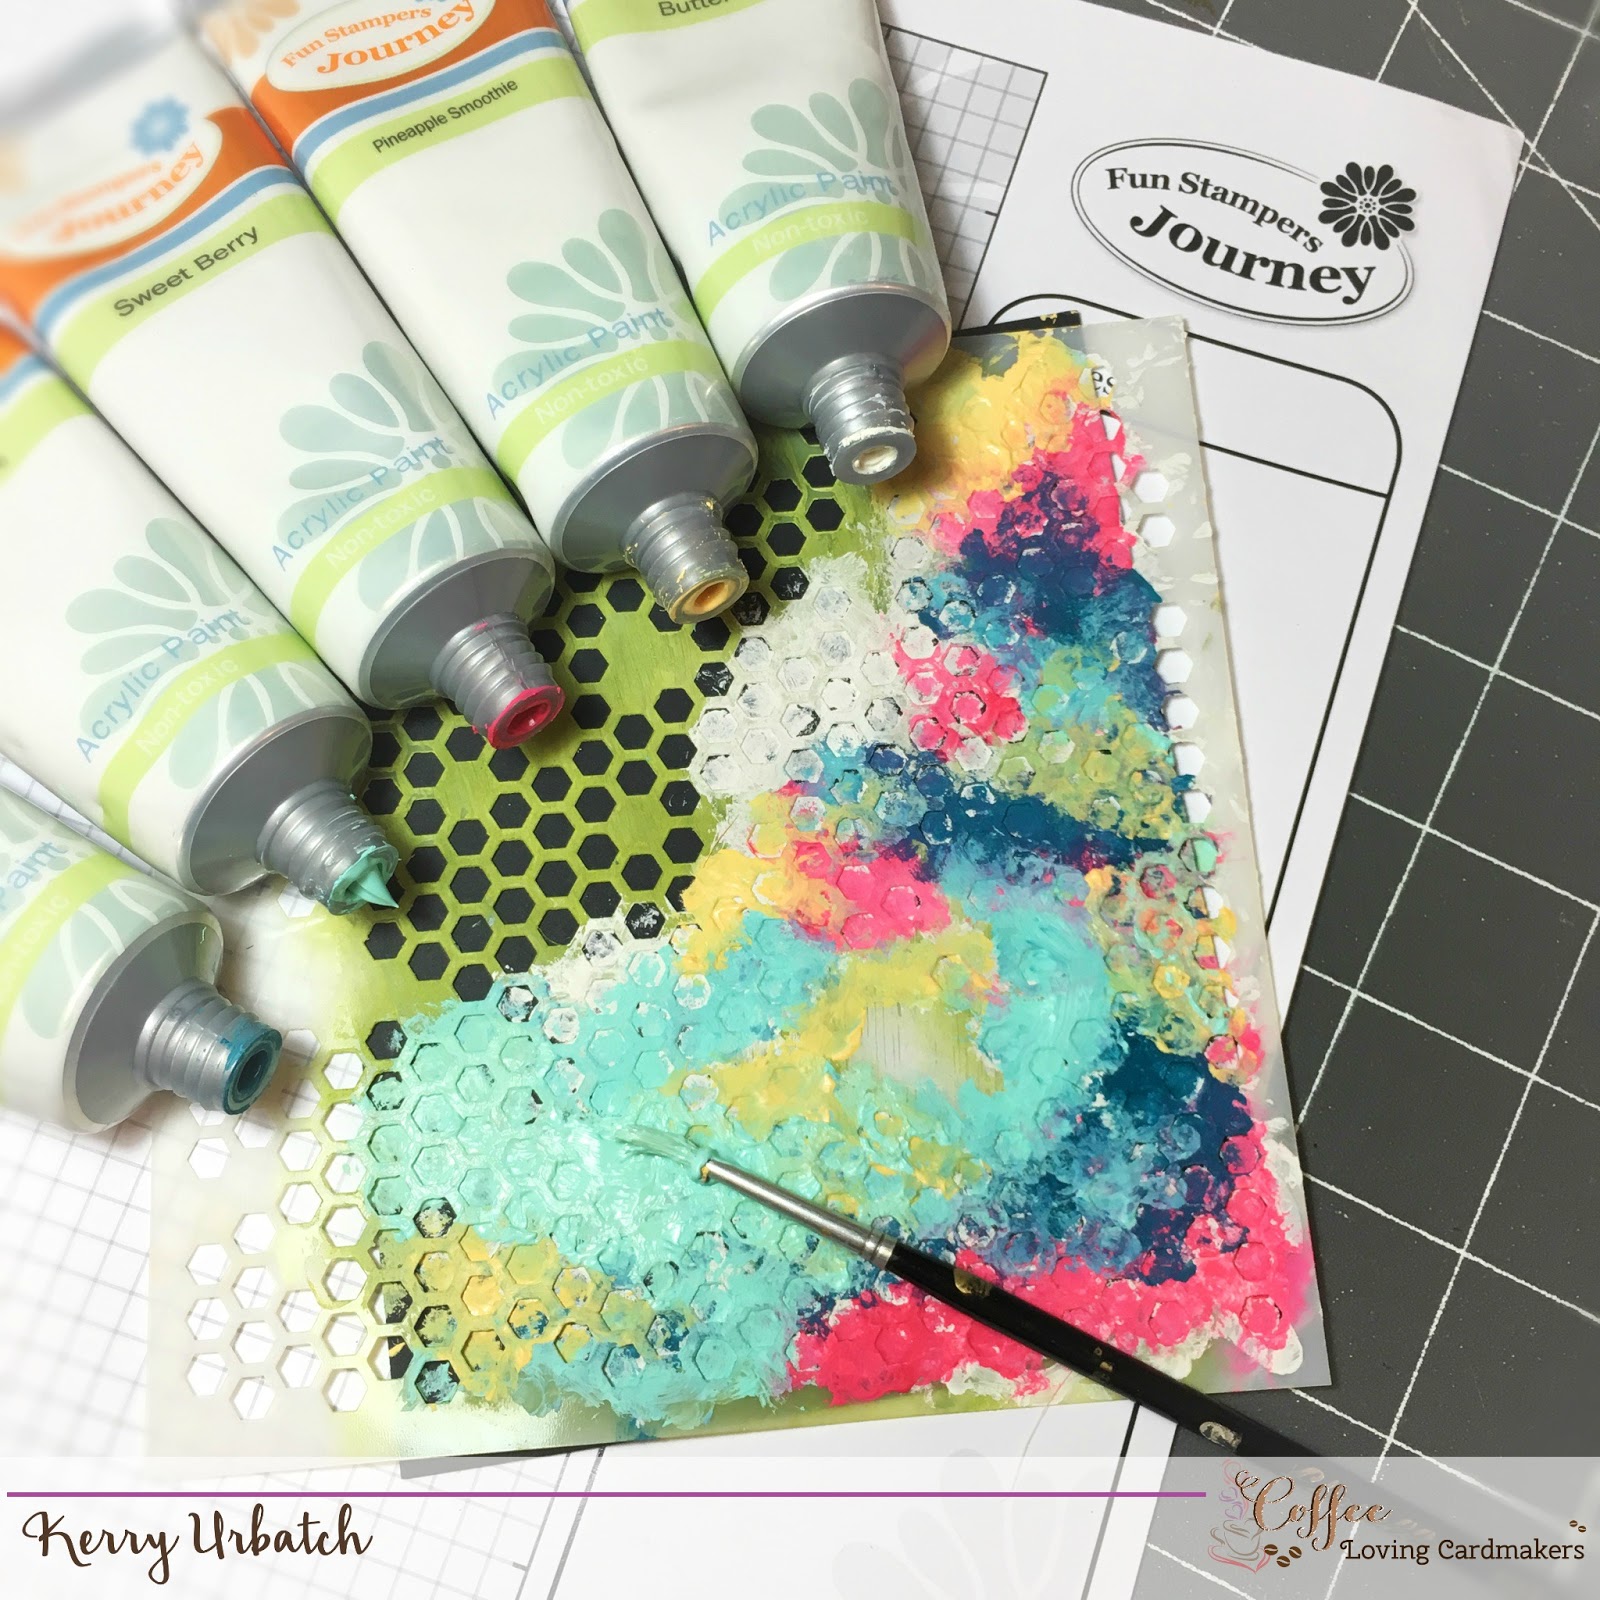
Check out my card that inspired the sketch this week! If you like the sketch, please feel free to join us in creating a fun COFFEE LOVING card with the sketch layout. Add your creations to the inlinkz below and when sharing to social media, make sure to add the hashtag #clcsipandshare! We would love to see your creations!
YUUMMMY!!! I love to create artsy backgrounds and this one was just too fun! I pulled out my Fun Stampers Journey acrylic paints and a stencil and got to work. It's fun using our acrylic paints to create card backgrounds so I encourage you to have some fun with this medium! It's not JUST for canvas work!
For today's background, I used the following acrylic paint colors: Butter Cream, Pineapple Smoothie, Sweet Berry, Cool Pool and Blue Lagoon. I also used the Vintage Screen 6x6 stencil.
I wanted the hexie pattern and the paint to show up bold and beautiful so I selected some Black Licorice cardstock as my base layer. After applying acrylic paint in a random dabbing pattern with my paintbrush, I peeled the stencil off and let it dry with my heat gun a bit. After it was dry, I trimmed this layer down and added some silver polka dot vellum in an asymmetrical design. I like how the vellum allows the stenciled design to peek through. After that layer, I attached some Cool Pool Satin Ribbon and started working on the tag.
My tag was created using the Tag Steel Rule Die and some Color Splash watercolor sheets. I used my stamp positioner tool to apply the stamps in the Le Cafe' set. The steamy coffee cup image in the background was stamped using Oatmeal Cookie ink. I applied the coffee press and the sentiment using Versafine Onyx ink and Journey Clear Embossing Powder so that I could apply some acrylic paint wash to the tag. After embossing and coloring the image with a few Copic Markers, I used watered-down acrylic paints as a wash over the whole tag. I added a bit more stenciling on the tag to tie the design in with the card base.
Once the tag was dry, I added some Black Journey Twine and Whip Cream Journey Thread to the tag. I attached the tag to the card using small foam squares. A little Cool Mint Stickles was added over some of the stenciled background to add some fun and sparkle. Gotta love my sparkles!!!
To finish the card off, I stamped the spoon with Black Licorice ink, colored with some Copic markers and added some Liquitex Metallic Silver Ink over the top. I also applied some Journey Glaze to give it a fun glossy shine. I mounted the inked and stamped panel onto Whip Cream cardstock then attached it "wonky style" to an A2 top-fold card base in Blue Lagoon.
What a fun card this was to create! I can't wait to send this card to a special someone this month! If you haven't explored the use of acrylic paints in cardmaking and stenciling, I recommend you give it a try! You'll fall in LOVE!!!
Now let's take a peek at this week's sketch. Yes, I work backwards in creating sketches...First the card, then the sketch it inspires...
If you decide to join us and create a card using my sketch, please add it to the inlinkz below! It'll automatically load onto the coffee-loving cardmakers blog post and will be added to this month's collection of fab cards! The Coffee Loving Cardmaking Designers will be watching social media too...so make sure to add the #clcsipandshare hashtag to all your coffee-loving creations. You never know, one lucky coffee-lover just might receive some happy mail for participating! :)
If you're interested in any of the products featured in this card, please click on the links...You'll be directed to my shop and you can go to town! WOO!
Friday, August 5, 2016
August Bloom Box is HERE!
Wahoo! My August Bloom Box is here just in time for the weekend! I'm planning a crafty weekend and four EXTRA projects for this kit. If you would like the extra projects all kitted up and mailed to you this month, make sure to sign up for the bloom box in my shop! I'll be sharing my finished projects for my Bloom Box customers on September 1st, but will share a few sneak peeks of them soon.
I guarantee you'll love my projects just as much as the projects in the kit...so make sure to order your kit today before it is GONE!
Check out my unboxing video here!
Check out Richard's video here!
Alrighty,
What are you waiting for??? Order your Bloom Box Today!
Wednesday, August 3, 2016
Adventure Awaits...
Hello there Stamping friends! Today I'm sharing a fun card I created using three of the newest stamp sets to our Fun Stampers Journey line. I am excited to share that I also created a video too that you can watch. Just click on the "Stamping With Kerry" photo above or scroll to the bottom of the page to see the video!
I won't go into much detail since everything is on the video, but I wanted to share that I need more wooden buttons. LOL...
Yummy, Yummy play with paper! I love crinkling, crinkling, crinkling the paper!
Aren't those boots yummy? I've got more plans for them too! :)
I won't go into much detail since everything is on the video, but I wanted to share that I need more wooden buttons. LOL...
Yummy, Yummy play with paper! I love crinkling, crinkling, crinkling the paper!
Aren't those boots yummy? I've got more plans for them too! :)
Supplies Used:
Embellishments: Black Journey Twine, Wooden Accents
Watch the video today!
Subscribe to:
Posts (Atom)