Showing posts with label Stencils. Show all posts

Sunday, July 23, 2017

Sunday Sip...Rise and Shine!

Hey there coffee loving papercrafters!  It's Kerry here and I'm back with a fun little card to share.  I spent some time playing and demoing the Gel Press with some friends on Friday night and created some yummy backgrounds for future cards.  I selected this background (made with Fun Stampers Journey Acrylic Paints and the Bloom Wall Stencil) and fell in love with all the yummy texture.  It literally felt like I needed to create a prickly card with it!  Since I don't have the new FSJ cactus stamp set called Arizona Trail, I discovered I had a fun alternative called Love Grow in my stash...but it would take a little imagination and doodling to coffee-fy it!  If you know me, I try to coffee-fy every set I own.  It's just a given.  LOL
So this cute Aztec type mug is actually a flower pot.  YUP!  A flower pot.  The set I used is full of them and there are many great succulents in the set too.  I knew that if I could add a handle to it, it would be FABULOUS!  Hee hee hee... So I did!  After doodling the handle with a black Micron pen, I watercolored the cup using my FSJ watercolor pencils and a superfine paint brush.  After it was colored, I cut it out and set it aside to work on the cactus plants.  
I think I stamped the cactus about four times over the top of each image (eyeballing it) with Lemon Grass True Fusion Ink.  After I got the intensity of the color I was looking for, I used that doodle pen again and doodled the cactus spines and the pleats, cut them out, and assembled them in a pleasing way on the paper.
Just look at the yummy texture achieved on the background!!! I spritzed a bit of water on the plate and the color blended a bit.  I loved that so I pressed it onto the paper.
Coloring a bit of the sentiment just brings it to life!  Below you can see the fun stamps in the set.  I love the "filler" stamps and even though I don't use the pots as pots, they make great coffee mugs!  :)  Natural Journey Thread was my ribbon of choice and I even added a bit of a "dirty" baby wipe (remains from the Gel Press adventure) to the edge.  I mounted the panel onto Green Olive cardstock then onto a Butter Cream Card base with a top fold (my favorite fold).  Adding some Candy Minis helped finish the card off.
Thanks for popping by to see my fun creation!  If you like the layout, give this week's #clcsipandshare Sketch Challenge a try.  Just post your card creation in the inlinkz below!  I'll be giving a yummy coffee-loving treat to one lucky participant!


Sunday, January 15, 2017

Sunday Sip and Share...I Love You a LATTE!

Hello there!  I'm back with another yummy Sunday Sip and Share for Coffee Loving Cardmakers. I'm excited to share this card with you because the background and the cut elements were created during a live demonstration to many of my fellow FSJ coach friends.  While FSJ held an amazing Leadership event in Las Vegas (I couldn't attend), almost 200 other coaches got together online for our own little event.  It was so fun!  So although I couldn't attend the event in Las Vegas, I was able to distract myself by creating, collaborating, sharing and communicating with many amazing Coaches from around the USA.  

In the final day of our event, I demoed several different Mixed Media products that Fun Stampers Journey carries.  I LOVE my mixed media, so this was like taking a happy adventure while still in my PJ's!  My goal was to share different ways one can modify modeling paste and gesso to create fabulous texture and color.  When sharing live on video, I created some swatches of yummy goodness and this red background (and the blue elements) were the awesome result.  I knew exactly what I was going to use the background for...My CLCSipAndSHARE!    
To create the deelish textured background, I first rubbed Journey Modeling Paste over the Stained Glass Stencil on some Candy Apple Cardstock.  Before removing the stencil, I sprinkled some sand over the top.  I rubbed it into the modeling paste and then removed the stencil.  After rubbing off the excess sand with my finger, I splattered some watered-down Modeling Paste onto the panel.  I then set it aside to dry.  
Next, I moved on to adding color to some Journey Gesso with a sprinkling of Huckleberry Fusion Pan Pastel (I scratched some dust off the pan with my fingernail). After adding a little water and mixing the color in, I was able to brush this colored gesso over a piece of white cardstock.  It took just a few minutes to dry.  

I then splattered some Silver Silk onto the painted paper.  Blue and silver are just the perfect pair! Then I set it aside.  After the demonstration, I stamped the coffee image and sentiment (from the Hey Sugar stamp set) onto this painted panel using Black Licorice ink.  

Wrapping some Candy Apple Red ribbon around the panel gave it the elegance I was looking for.  I then cut out some pieces (a banner, a sentiment and the cup) and assembled my panel.  It was mounted onto a Whip Cream card base.  

I just LOVE how this card turned out.  The texture, the colors, the layout...It's fun, non-traditional and so very touchy-feely! 

I finished this challenge by creating the coordinating sketch for this card.  Want to join the fun sketch challenge?  Please do!  Just create a card that is inspired by this sketch and post a link to it on our link up below.  I'll be awarding one winner a special coffee-loving prize at the end of the month!  


Sunday, August 21, 2016

Sunday Sip and Share: Le Cafe'

Hello there coffee-loving friend!  It's Kerry here with another Sunday Sip-and-Share at the Coffee Loving Cardmakers blog!  I hope you've been enjoying my yummy Sunday creations over there and this week...I'm featuring YUMMY FSJ Products!  WAHOO!!!

Check out my card that inspired the sketch this week!  If you like the sketch, please feel free to join us in creating a fun COFFEE LOVING card with the sketch layout.  Add your creations to the inlinkz below and when sharing to social media, make sure to add the hashtag #clcsipandshare!  We would love to see your creations!  
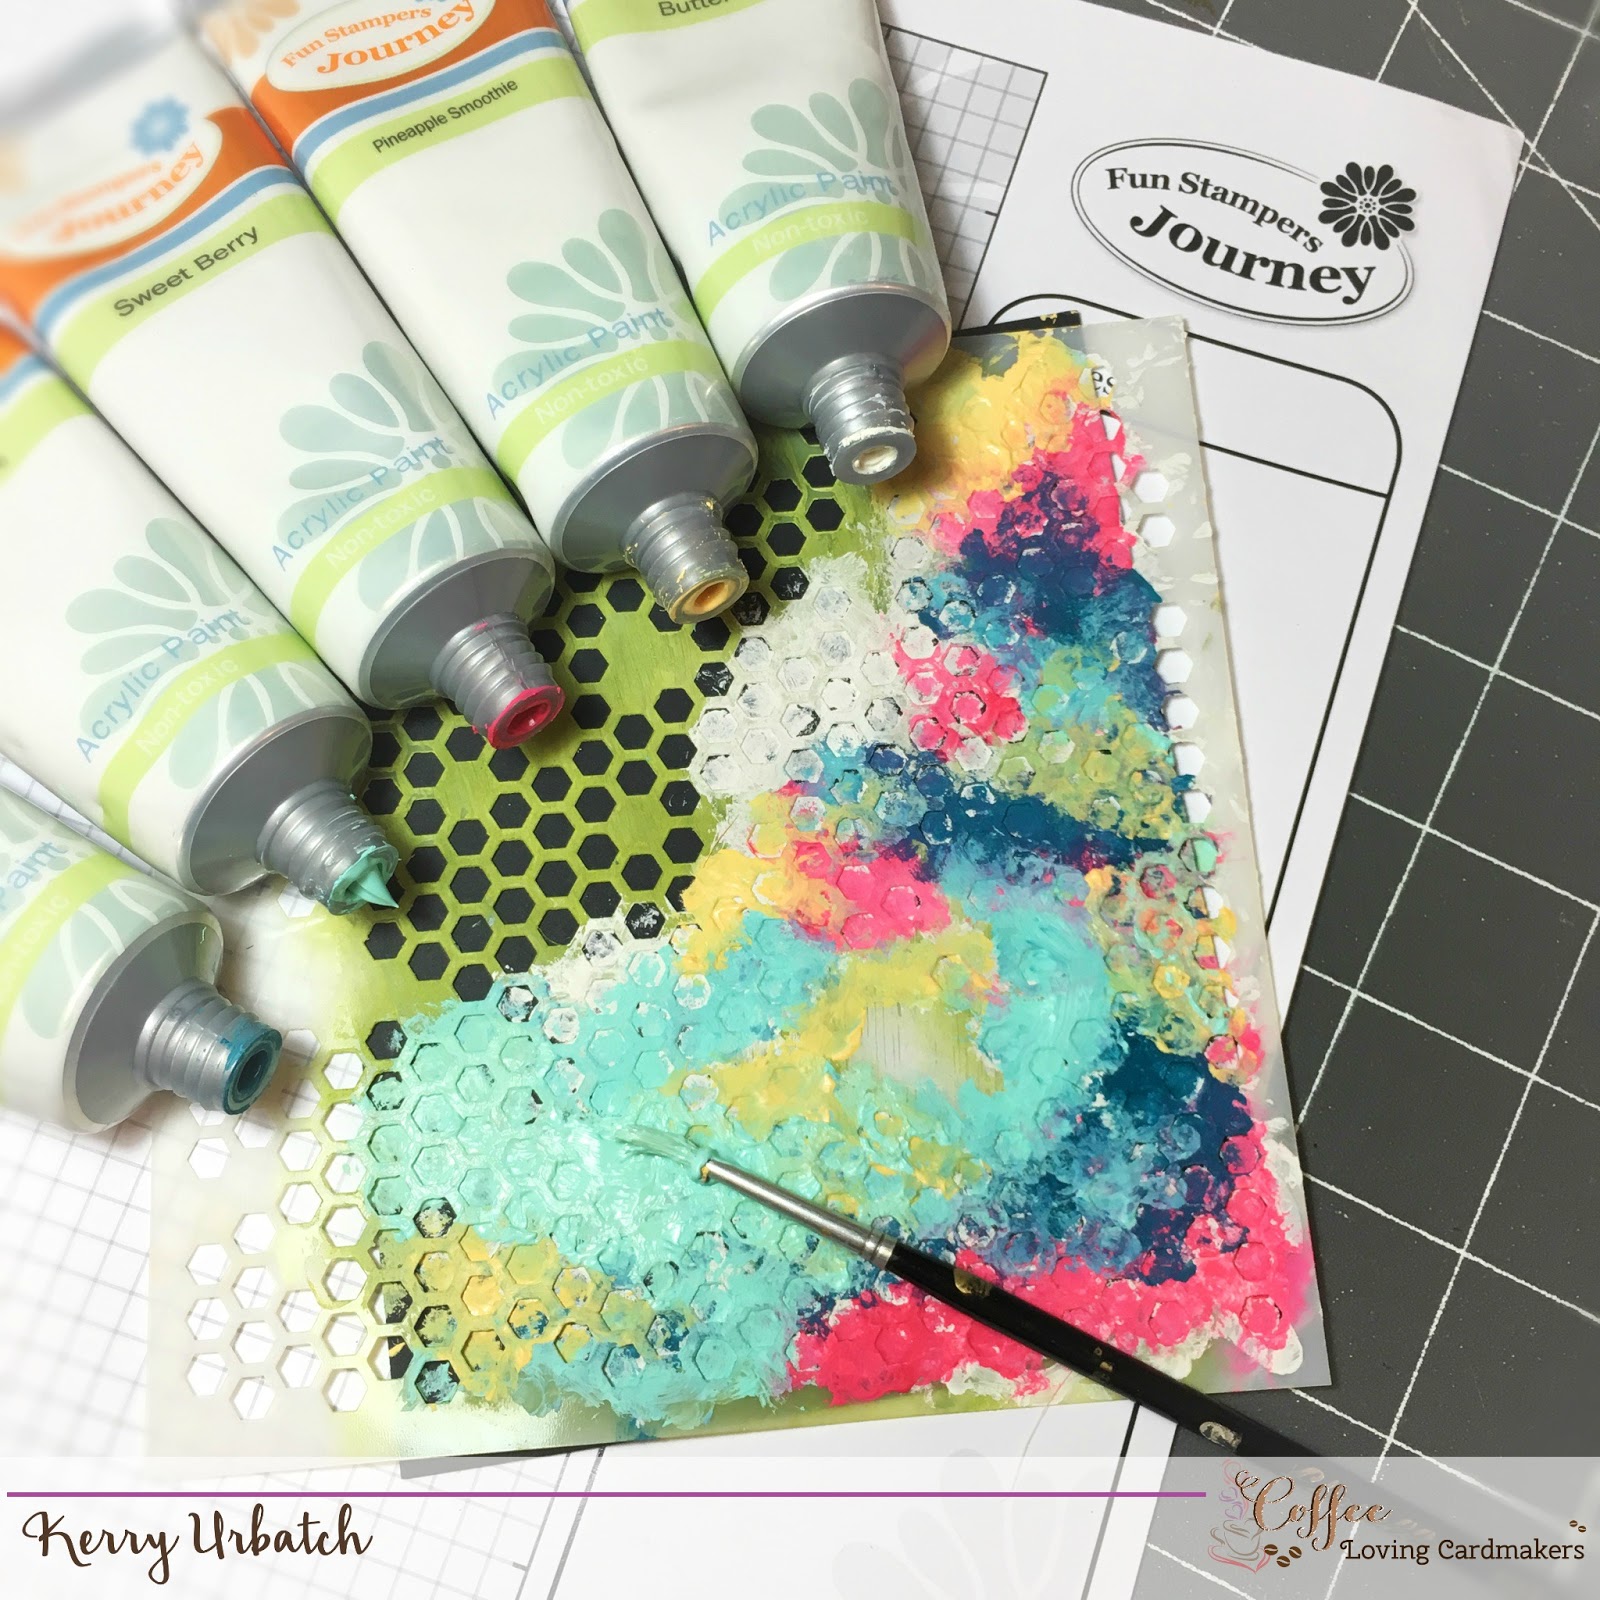
YUUMMMY!!!  I love to create artsy backgrounds and this one was just too fun!  I pulled out my Fun Stampers Journey acrylic paints and a stencil and got to work.  It's fun using our acrylic paints to create card backgrounds so I encourage you to have some fun with this medium!  It's not JUST for canvas work!  

For today's background, I used the following acrylic paint colors:  Butter Cream, Pineapple Smoothie, Sweet Berry, Cool Pool and Blue Lagoon.  I also used the Vintage Screen 6x6 stencil.  
I wanted the hexie pattern and the paint to show up bold and beautiful so I selected some Black Licorice cardstock as my base layer.  After applying acrylic paint in a random dabbing pattern with my paintbrush, I peeled the stencil off and let it dry with my heat gun a bit.  After it was dry, I trimmed this layer down and added some silver polka dot vellum in an asymmetrical design.  I like how the vellum allows the stenciled design to peek through.  After that layer, I attached some Cool Pool Satin Ribbon and started working on the tag.  

My tag was created using the Tag Steel Rule Die and some Color Splash watercolor sheets.  I used my stamp positioner tool to apply the stamps in the Le Cafe' set.  The steamy coffee cup image in the background was stamped using Oatmeal Cookie ink.  I applied the coffee press and the sentiment using Versafine Onyx ink and Journey Clear Embossing Powder so that I could apply some acrylic paint wash to the tag.  After embossing and coloring the image with a few Copic Markers, I used watered-down acrylic paints as a wash over the whole tag.  I added a bit more stenciling on the tag to tie the design in with the card base.  

Once the tag was dry, I added some Black Journey Twine and Whip Cream Journey Thread to the tag. I attached the tag to the card using small foam squares.  A little Cool Mint Stickles was added over some of the stenciled background to add some fun and sparkle.  Gotta love my sparkles!!!  

To finish the card off, I stamped the spoon with Black Licorice ink, colored with some Copic markers and added some Liquitex Metallic Silver Ink over the top.  I also applied some Journey Glaze to give it a fun glossy shine.  I mounted the inked and stamped panel onto Whip Cream cardstock then attached it "wonky style" to an A2 top-fold card base in Blue Lagoon.  
What a fun card this was to create!  I can't wait to send this card to a special someone this month!  If you haven't explored the use of acrylic paints in cardmaking and stenciling, I recommend you give it a try!  You'll fall in LOVE!!!  

Now let's take a peek at this week's sketch.  Yes, I work backwards in creating sketches...First the card, then the sketch it inspires...
If you decide to join us and create a card using my sketch, please add it to the inlinkz below!  It'll automatically load onto the coffee-loving cardmakers blog post and will be added to this month's collection of fab cards!  The Coffee Loving Cardmaking Designers will be watching social media too...so make sure to add the #clcsipandshare hashtag to all your coffee-loving creations.  You never know, one lucky coffee-lover just might receive some happy mail for participating!  :)

If you're interested in any of the products featured in this card, please click on the links...You'll be directed to my shop and you can go to town!  WOO!  


Tuesday, June 21, 2016

Summer Coffee Lovers Hop Day 5: Coffee Buzz!

Hey there happy hoppers!  It's the FIFTH day of the hop and by now you should pretty much have a coffee lovers BUZZ!!!  So to show how WIRED I am, I jumped out of my color comfort zone and went a little WILD!  I slapped my coffee cup stamp onto an acrylic block, pulled out some of my favorite FSJ acrylic paints, gel medium, modeling paste, grabbed a flower-ish stencil and got MESSY!  
I decided this time I would go all mixed media and create something wild and crazy...and of course ME being a person who loves adding layers upon layers of ribbon, papers and medium...I just couldn't hold back!  
Here she is in all her vibrant glory!  A bit much?  ehhh???  I don't know.  I'm kinda diggin' it...or, maybe it's the coffee buzz talking.  Either way, another one in the books!  :)
 After stamping the cups with Black Licorice ink, I painted them a bit with some of my FSJ reinkers and some blending solution, then applied Prismacolor pencils on them for added color.  I fussy cut those babies out and set them aside for the collage.  I also cut out the leftover parts from some flower diecuts I had sitting around.  It's nice to use these scraps too!
Of course, I had to add a SWEET sentiment and some little candy dots!  :)  Hope you enjoyed my creation and I'll see you tomorrow for round 6 of my Coffee Lovin' Crafty Adventure!  

FSJ Products Used (Available Now):  

FSJ Products Used (Available July 1):

Non FSJ Products:  
Canson Watercolor Paper
Gold Ric-rac
Staples

Reminder:  As a SUPER SPONSOR and a FLASH PRIZE SPONSOR for this hop, I will be giving away the following items to some lucky hoppers:  

Super Sponsor Prize:  
NEW (To be released July 1.)  "Hey Sugar" stamp set.
Flash Prize:  
$25.00 Gift Certificate to my online shop!  

*** You can view my previous posts here: 

Our 40% off Retirement Sale is Going ON NOW!  Check out all the amazing price cuts on our top-quality products.  While we hate to see them go, we've gotta make room for our new catalog products that will become available July 1!  (Our Coffee set:  ENJOY COFFEE SET is reduced to $10.17!)   Hurry, all products available while supplies last!  

Thanks for popping in and have fun hopping! 

Wednesday, October 28, 2015

beBrave

This month I've been contributing cards to several different card drives for Cancer Awareness Month.  I created the following cards for the beBrave drive at Fun Stampers Journey:
I played around with my new favorite stencil Bloom Wall ($6.95) and some cheap white Apple Barrel acrylic paint and added some reinkers Sweet Berry ($5.95) and Beach Breeze ($5.95) and to change the color.  I wanted the ink underneath to be really messy so I just applied some paint to the stencil and slapped it on the Sweet Berry paper over and over...After applying the messy stenciling, I overlayed the "neat" stenciling on top with a heavy application of white paint and one of the plastic panels from the HOPE ATS stamp ($7.95) I used acted as the "spatula".  
I'm one for layers upon layers of cardstock as I create my cards, so it was fun to keep assembling the layers here. I also offset the ribbon using the pierced oval diecut.  
Adding a little charm tied to the satin ribbon bow just finished it off.  If you look close enough, you can see that the pink ribbon was heat embossed with over three layers of clear embossing powder. YUM!
The second card was created with the leftovers from the card above.  I didn't want to toss the extra strip of stenciled pink paper so I decided to create a "strippy card" with other scraps on my workdesk. 
 As you can see, I splattered, spritzed, tore, and stamped.  SOOO FUN!  PS...I had to use a Mat knife to cut the inside of the ribbon...I think FSJ needs to come out with a coordinating die for this stamp (PLEASE!).
Stop back again for a few more cards I created for this special card drive.