Wednesday, July 5, 2017

Give it a GO!...Part 1

Hey there Journey Friends,

Today I'm beginning the massive share of a selection of projects I created to submit to Richard Garay's Designer Showcase.  I was excited when he announced the call and started working on some special projects immediately.  I compiled all my projects into a gallery on my team FB page (JOIN TEAM ITCHIN INKERS TODAY!) so that I could get the input of my fellow team members who would then vote on the ones I should submit.  It was important to me to get their input and was my first stage in my project submission process.

I'll be sharing the projects I created for this call.   Although I LOVE all of the projects I proposed for this call,  I could only submit two cards and one scrapbooking design, so I am so grateful to my team for helping me make the final decisions!  After the three projects are entered tonight, I'll be back tomorrow to share the projects I created that "didn't make the cut".  So pop back over tomorrow to see them.  As with all of my project shares on my blog, I will share ONE PROJECT PER POST as they will include my creative process and additional photos.
I LOVE the whimsical flowers in the Chosen Family stamp set and I just had to start out my creation process with this amazing set.  I focused in on the stitched circle bloom and decided I wanted to make a background with it.  SOOO...I cut some Ivory DMC floss and colored it with my new Bubble Gum Liquid Color. It colors beautifully!  
 Pretty awesome, right?
So after the thread was done, I painted circles on the canvas using Bubblegum Liquid Color and a Large Water Brush.  I didn't worry about symmetry and perfection because I wanted to maintain the whimsy of this design. I doodled some circles onto the Canvas Sheet (cut to size) and over the pink circles to mimic the design of the stamp using the Journey Silver Marker.  I love using Canvas Sheets when I'm hand stitching cards because the canvas is so giving it doesn't leave pierce holes like cardstock does.  It's a perfect surface for mixed media and fun ink techniques!  

After that, I took some of the pink thread and a needle and stitched some stitches onto the circle edges.  I did this with both the pink and black thread.  When the background was complete, I set out to create the flowers and the top layers of the card.  
I stamped the three flowers onto Whip Cream Cardstock using Black Licorice Ink.  I colored them with a mix of Bubblegum Liquid Color and Sparkle Silk.  This combination creates an amazing sparkle pink!
After stamping, coloring and fussy cutting the flowers (this stamp set is available with a coordinating die set too), I laid the flowers out onto the Vellum panel so that I could arrange a pleasing design.  I stamped the sentiment into position and attached the flowers with Small Foam Squares.
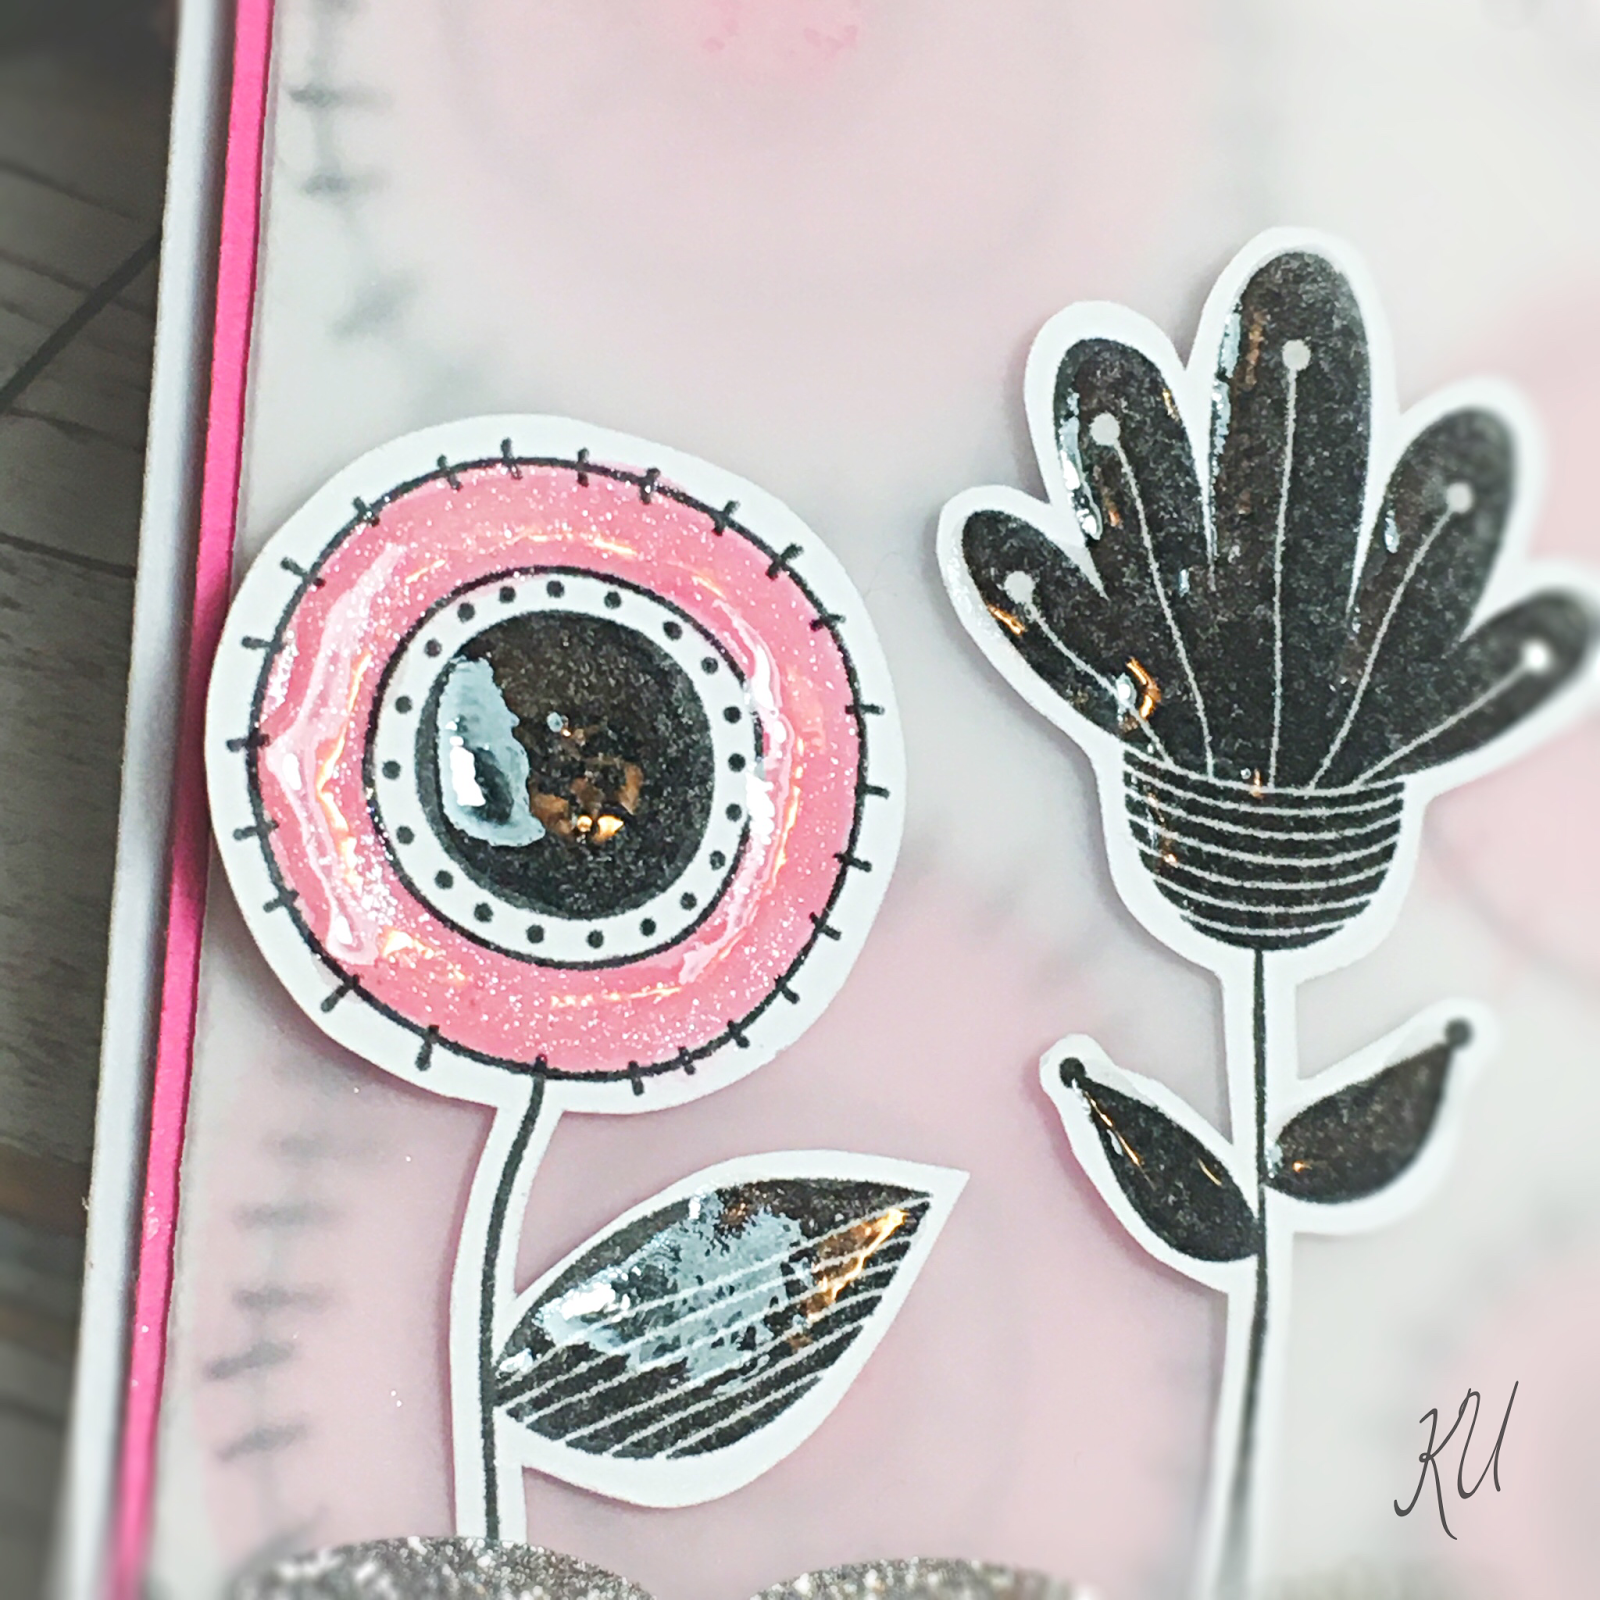
To finish the card off, I applied Journey Glaze onto the flowers and the sentiment, added some Silver Scalloped Sparkle washi tape and tied some Black Twine onto the bottom.  I mounted this panel onto Watermelon Fusion Cardstock and then attached the whole stamped panel onto a Whip Cream card base.  Adding a little pink Sweet Candy Drop finished the card off!
 All of the products featured in this card creation can be purchased in my shop.  Just click the items listed above and you'll be directed to each item.  Thanks so much for stopping by to check out this "Made the Cut" project.  I'll be back in a few minutes to share another "Made The Cut" creation!  Toodles!  

Tuesday, July 4, 2017

Happy Fourth of July!

Hello there Journey Friends!

Sending you July 4th sparkles and pops!  Hope it is fun...and the BOOMS are kept to a minimum.  :)

This was a fun (and quick) card to create!  I started out by creating a star-shaped card base using Whip Cream Cardstock.  I then applied a Mirror Silver Cardstock star shape to the top using the largest Star-Dom star die.  After that, I diecut some star strips from the Border Details Die Set using some Rich Coral and Catalina Splash Cardstock.  I tied these strips and some sparkly Twinkle Trim with some Black Twine and a scrap of Candy Apple Red Satin Ribbon to create a fun and festive embellishment spray.  I popped that up on the star using some Small Foam Squares and one little Sparkle Drop.

I just love how crisp and clean the letters cut!  They are very sturdy and hold up well without risk of bends on this paper!
To finish the card off, I diecut the U.S.A using Mirror Gold cardstock and the Journey Serifs Steel Rule Die stamped (with Denim Days and Rich Coral Ink) a few polkadotty stars from the Star Bright Stamp Set.  It's such a well-loved set in my collection.

It's so fun creating a non-traditional shaped card so I encourage you to take your dies and use them for card bases!  You'll be glad you did!

All products used to create this festive card can be purchased in my shop.  Just click on the item names to go directly to the product!  :)  Happy Shopping!

Monday, July 3, 2017

2017-18 Inspiration Book and Catalog is LIVE!

Yipeeeee!!! Our new 2017-18 catalog is LIVE!  It's packed full of gorgeous product and inspiration, I can attest to that!  Want one?  Order your catalog on my site today HERE and I will send you a Holiday Mini Catalog when it goes live next month!  

I've been working hard creating delish projects to share on my blog and with customers and am scheduling classes and parties now.  Please let me know when you would like to host your party so I can work closely with you to cater it to your needs.  

Watch my blog in the next few days for some amazing fun to come this way!

Tuesday, June 27, 2017

So Long, Farewell...

Hello there Journey Friends, I'm here to share a creation I made today using the very first Fun Stampers Journey stamp set/die combo of my collection.  The Banner Party Stamp set and the coordinating Pennants Die Set are retiring at the end of the month.  WAAAHHH...It's an oldie but goodie and I'm sad to see it go.

I created this card to say farewell.  If you LOVE this set as much as I do, you can pick it up before it retires and/or while supplies last.
I paired the stripe square stamp with some fun colors and added a few circle stamped elements to play along.  The twine works perfectly, just as the silver scalloped washi!  
 I compiled a little bundle for you if you would like to recreate this card:
Shop now and SAVE!

Pretty Posies and Liquid Color

Hey there Journey Friends, I thought I'd pop in to share a little card I created after reading the Fun Stampers Journey Blog today.  Richard's Tuesday Tip included a fun technique and a beautiful card featuring my ISU Cyclone colors so I just HAD to give the techinque a play and create a card inspired by RG's creation.  Check out his original post HERE.  Make sure to subscribe too.  You'll be glad you did!  
I used pretty much the same materials to create my version of his card EXCEPT...I didn't have any Cling Wrap so I used a plastic bag crumpled up.  I think it worked just the same!  I also added a few pretty embellishments and held restraint with my images and contained them to the central portion of the card.  Splashing a bit of Cranberry Bliss and Sparkle Silk onto the card added another yummy layer to this gorgeous design.  Hope you can see the sparkle washi peeking through too...just a tad bit to highlight the splashes of sparkle silk.  
YUMMY right?  This set has got to be one of my favorites of the new catalog and I'm so glad convention brought it to me!  I'm using it like crazy and I can't get enough.  You'll want to pick yours up along with your Liquid Color Bundle when the new catalog goes live for purchases on July 1.

Cool Beans!

Hey there coffee loving cardmakers!  I'm back with another fun card for the coffee-lovers hop!  This time, I created a yummy card using the June Bloom Box for Fun Stampers Journey. Don't know what a Bloom Box is?  Well, it's a monthly kit that arrives at my door and includes a full size red rubber stamp set, four kitted card projects and a full color instruction booklet.  This month's kit includes a fun "punny" set with this cool beans sentiment box.

As a Creative Coach for Fun Stampers Journey, I have the opportunity to sell these kits and provide little perks to my Bloom Box Subscribers.  I create four additional (possibly more) card kits each month to send to my Bloom Box subscribers. They include tutorials too!  SO fun!  It's a great way to maximize the potential of each bloom box stamp set!

I think this set was made just for me!  hee hee.  I wonder if Richard planned the perfect timing for our hop too???

To create the card, I did a little masking of the images.  I stamped the "Cool Beans" block stamp with just an outline, then stamped the sentiments on the edges.  After that, I stamped the image in its actual design and cut it out.  Next, I distressed the edges using some deeeelish Dark Roast ink and a Dauber Dowel blending tool.  I added some Bronze and Dark Roast Silk as well as a few splashes of Journey Glaze then assembled the card.  SO FUN!
Whip Cream Cardstock, Pomegranate Splash Cardstock and Oatmeal Cookie Cardstock were a perfect combination!  Using the little freebie tags from the Spring into Summer mini just set the card off too.  Black Journey twine is also a must,  don't you think?!  Licorice Sparkle Washi and a piece of a coffee filter finish it off!

Thanks for stopping by!  Hope you enjoyed this little perk-you-up!  See you tomorrow for another yummy creation!


Sunday, June 25, 2017

Sunday Sip...Aromatic Posies...


Hey there coffee loving friends.
Happy Sunday Coffee Loving Cardmakers.  It’s Kerry here and I’m excited to get back to some sort of normalcy and calm after a wild and hectic few months.  I hosted a Fun Stampers Journey Booth at the Scrapbook Expo in Chantilly, VA this weekend and met many of my fellow Coffee Loving papercraft friends!  If you’re reading this I’m waving HI and giving another hug!  It was a blast, and today I’m just catching up and cleaning.  Ughh…
I decided I would post a little aromatic card today.  Sometimes I like to send cards that contain a scent that brings back warm memories and this card does just that.  Waking up to a fresh Perkolator pot of coffee on a Sunday morning at my Grandma and Grandpas was always a fun treat when I lived with them during my college years and I loved sitting with them at their formica table sipping coffee and listening to the church service online…Oh memories…  So the aroma of this card…Memories!
I glued some coffee beans to the inside of my flower (created using the Summer Bouquet steel rule die and the leaves from Flower Swirls set that will be available July 1).   I created the background using our new Liquid Color which is an amazing concentrated watercolor.  I love that I can squirt a few drops in a mister and spritz some yummy color on my paper.  I stamped the little circle elements from Laura Williams’ doodled stamp set that is launching through FSJ on July 1 called Hello Love. 
I hope you’re enjoying the hop so far.  I’m off today to do the rounds and will start creating a few more cards for the hop too.  See you around!
If you LOVE this sketch, please consider playing along with the sketch.  I’d love to see how you incorporate your Coffee Love with it!
Hop along with us!