Sunday, September 25, 2016

Falling for Coffee!

Hey Journey Friends!  Today I'm sharing a non-traditional "Fall" card and gift set that I created for the Fall Coffee Lovers Blog Hop AND the canyoucaseit.com challenge #139 (Rainbow colors). This'll be a little treat for someone special who's hopping along with all of us!  

I decided to take the "Fall" theme out of the box and interpret it a different way...as in FALLING FOR COFFEE!  Take a look at my twist on this theme.  
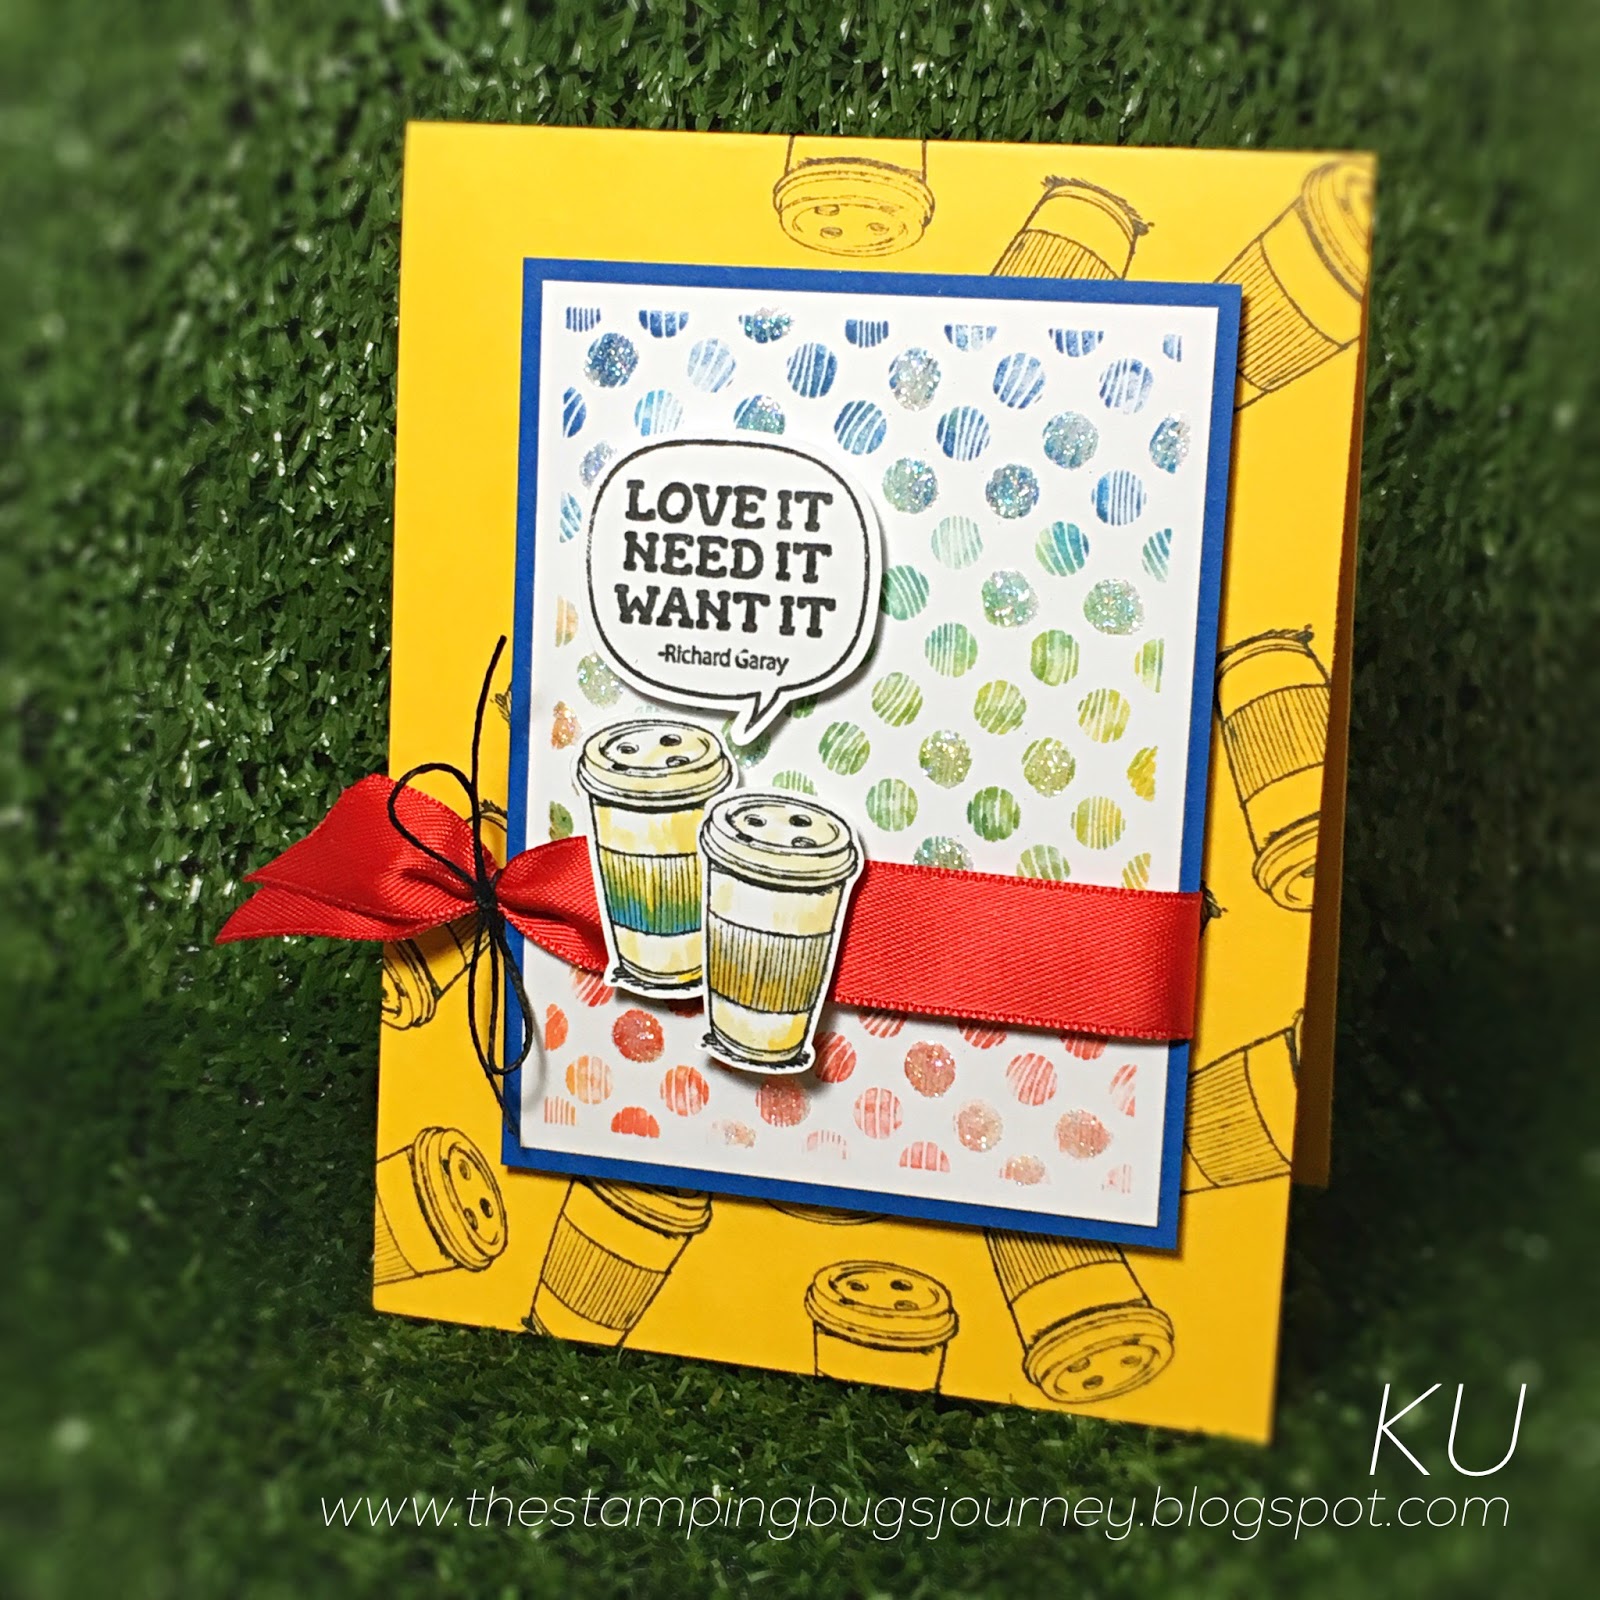
I started out by dabbing a rainbow of FSJ reinker colors onto some Acetate.  After I had them inked up, I laid another piece of acetate over the ink and rubbed it together.  This blended the colors and prepared an inky surface for my stamp.  I placed the stamp into the ink and twisted it a bit to let the colors settle in then lifted and applied it to my Whip Cream cardstock.  I then applied some Journey Glaze to random dots and sprinkled some Sparkle Dust on them.  
Next, I stamped the sentiment (from a fun Richard-ism wood set that I received as a treat for attending Convention last summer.  I also stamped some of the coffee cups using Black Licorice ink and painting some reinker onto them for color.  
I just love how the reinker can be used as a coloring medium and since a little goes a long way, my reinkers seem to last FOREVER!  After that, I stamped the cups in a "falling" pattern on the background paper and assembled the card.  I just love tying my ribbon that way!  Black Twine and Candy Apple Satin Ribbon do the trick!  
After assembling the card, I also created this little treat bag.  Inside, there is some secret coffee loving stuff!  TOP SECRET!  I elected to add some fun trim, a chunky wooden clip and tied a string onto the clip to attach it to the festive striped bag.  A perfect and quick little coordinating bag with a little WOW factor!  
 Just too yummy not to take a few close-up shots!
Interested in the products I used to create this fun "fall" gift set?  Please check out the products in my online shop!  

Stamps:  Richard-isms (exclusive Coach set), Deco Dots, Hey Sugar

Thanks for stopping by to check out my projects today!  I hope to be back again tomorrow with another fun coffee loving creation!  See you then!  :)

Friday, September 23, 2016

Fall Coffee Lovers Hop starts TODAY!

September 23-September 30
Theme:  Fall Coffee, tea & or cocoa project
National Coffee Day:  September 29
#fall2016clh

I'm excited to join the Coffee Loving Design Team in welcoming you to the Fall Coffee Lovers Hop! I'm sure this hop will break records for participation and for awesomeness...just as in hops of the past!  Just you wait, will we hit over 800 link-ups???

I'm also excited to share that I'm a SUPER SPONSOR and will be giving ONE LUCKY PARTICIPANT a gift certificate to my shop for $25.00 AND a sweet Coffee-Lovers TREAT bag of goodies!  Make sure to comment on our posts!!!

So let's get this party started!  Today I'm sharing the first of my cards for this hop.  I hope you enjoy them.  I slaved away while sick as a dog creating it.  LOL.  I'm still a bit under the weather, but cardmaking has a way with taking the "icky" feelings away!
I decided to make a little Peek-a-boo fall card using one of my yummy Fun Stampers Journey Dies. After stamping my background (Whimsy Wallpaper) and spritzing with Shimmer Gold Color Splash, I diecut the leaf die (Summer Branch Die) onto the cardstock to create a partial cut.  I raised some of the leaves a little and pinched them to create dimension.  After that, I mounted a piece of Cranberry Bliss Cardstock underneath.    I also stamped the sentiment onto a banner die (Cookie Exchange Die Set) cut from Orange Rave Cardstock.   Both the sentiment and the latte cup (Hey Sugar Stamp Set) were stamped using Hazelnut Blend Ink.
Taking a closer peek at the card, you can see the splatter I added to the card.  I love adding splatter to my cards lately and the effect is quite simple to achieve.  Here, I used a combination of Gold, Silver, Orange Rave Silk and some watered down Butter Cream acrylic paint.  
To finish off today's card, I distressed and curled the edges of the stamped panel a bit, added an Olive Green satin ribbon and some Natural Thread tied in a bow and mounted the panel onto an Olive Green Cardstock base.  I hope you enjoyed this creation!  

If you're interested in the products featured in this post- or would like to become a Fun Stampers Journey Coach in the USA (and its territories), TODAY is the day to become one at the AMAZING price of 99.99!  Check out all the goodies that will come in the special Coach starter package:
This kit includes the brand spankin' new small version of the Journey Platinum diecut machine!!! The AMAZE is a top-of-the-line diecut machine that is perfect for transporting to crops, classes and crafty events!  Fun Stampers Journey Coaches have the LOWEST quarterly minimums in the DSA industry. $150.00 a quarter is all that's needed to maintain active status which allows you to receive all of the benefits possible as a coach.  To find out more about becoming an FSJ Coach (hobbyists, artists and buisiness builders welcome), please contact me for more information.

Note:  Fun Stampers Journey products are currently available through a coach like me and products can be shipped within the USA and its territories.

Wednesday, September 7, 2016

Happy Anniversary Mom and Dad!

Just popping in to share a cute card I created for my parents...While they galavant all over the globe, I work, work, work and wish, wish whish.  They've earned their exploration wings and play dates in retirement and I'm happy they are able to take the many adventures they do.
Many, many more adventures to come!
I created this card using the "An Adventure" (stamp and die bundle, stamp only) stamp.  Since I enjoy fussy cutting, I cut the submarine myself instead of using a die.  I colored the submarine using a few gray Copic markers and blue markers.  I also overlaid some Liquitex Silver Metallic ink on the colored image.  It's a fabulous translucent metallic ink that creates a soft shimmer over colored images.  

I stamped the World Map background stamp onto Beach Ball Cardstock using Beach Ball Ink.    Then, I punched some holes into vellum with various hole punches in my collection (3/4 circle, 1 inch circle, 1 1/4 inch circle, Punch Handle).  I assembled the card in my favorite wonky layout design onto a whip cream cardstock base.  To finish the card off, I added a bit of Beach Breeze and Whip Cream thread to the edge.
I added a bit of Journey Glaze to the portholes and the little windows.  I also attached the sentiment to the map panel using a staple.
Using Medium Foam Squares really help give this card life!  When creating a layered card like mine, I think it's important to use varying layers- and dimensions...to achieve the full AHHHHMAZING effect!

Monday, September 5, 2016

A rose is not just a rose...

Hello Journey Friends,

Today's a special day!  Today is my Momma's birthday!!!
She doesn't live near me anymore so it's sad I can't celebrate her birthday with her.  So while she's having fun with my Dad and enjoying her free time in retirement, I sit here thinking of the time I'll be able to visit with them again...

I sure hope she has some fun times today!  I decided to make a card for her that would incorporate some of our favorite things...music, flowers and....YELLOW!  I hope she likes it!  
To create this card, I stamped the Vintage Notes background onto Buttercream cardstock and onto Limeade Splash cardstock using a mix of Kiwi Slice, Limeade Splash and Electric Lime inks.  After that, I rubbed a bit of Bubble Gum and Banana Cream ink onto the edges.  I also splattered some Gold Silk, Electric Lime and Sour Lemon Silk onto both stamped layers.
Next, I tore a piece of vellum and rubbed a bit of Electric Lime ink onto it, then wrapped some natural thread around the vellum.  I added it to the stamped layer in a collage fashion.   The rose (Summer Rose) was created using Sour Lemon Splash and Limeade Splash and  Kiwi Slice ink.  I wanted a few yellow posies (yellow roses and flowers are my Mom's favorite) so I diecut some Spring Bloom Mini flowers and colored them with a DTP method using Bubble Gum and Banana Cream and Lemon Drop ink.
To finish off the card, I cut a small tag using the Tag Elements die set from Whip Cream cardstock and stamped it with the Happy Birthday sentiment from a retired set.  I layered this panel onto Whip Cream cardstock then mounted onto a Lemon Drop card base.

Thanks for popping in to check out my Momma's birthday card!  I hope she enjoys it!

Happy Birthday!!!
Love you Mom!!!  

Sunday, September 4, 2016

Sunday Sip and Share...It's PSL time!

Hello there coffee loving friends.  Kerry here for another fun Sunday sip and share... and some exciting news!  I know many of you are just as excited as I am for the almighty season of the PUMPKIN SPICE LATTE so I've got a treat for you today!  Let's ring in the season with a spicy tribute to the delectable treat that is a welcome sign that FALL is on the way!!!
I started out by creating a yummy pumpkin spice-like spill (puddle smushing) on some Butter Cream Cardstock using a mix of Orange Rave Color Splash, Sour Lemon Color Splash and a few spritzes of water onto a plastic bag.  After it dried, I stamped the Cozy Wishes mug using Pumpkin Bread True Fusion Ink.  Once the background was finished, I glued it "wonky style" onto my Cocoa Powder cardstock and trimmed it to size.  
I wanted to create a fun sentiment incorporating the Pumpkin Spice Latte theme and since I didn't have a specific PSL themed stamp (YET), I decided to create my own!  I arranged the Marquee Type alpha stamps onto my acrylic block and selected the "wishes" sentiment from my Jolly Friends Stamp set.  I stamped them onto a strip of vellum using Clear Pigment Ink and then applied Journey Gold Embossing Powder with my heat gun (ON SALE!)  
I added a little heart embellishment strip of paper to break up the vellum strip a bit.  It also allowed me to use some of my new yummy Amazing sequin trim that I picked up last week at the Be Amazing stamping event in Virginia Beach.  I just punched the stamped heart with my hole punch (on sale now!, attached it to the paper strip using some Natural Journey Thread and tucked the trimmings in with the thread.  
Just one last shot to show the shimmer on the card!  I spritzed the background (and the sequin trim) with Shimmer Gold Color Splash.  SO FABULOUS!!!
As you know, I work backwards…I create a sketch AFTER my card is finished…I love this wonky layout.  If you love the layout too, please join us in creating something fun with the sketch as inspiration!  When sharing your project, please include the hashtag #clcsipandshare on social media so we can access all the gorgeous creations in one place.
PS…. I soooo appreciated seeing the projects inspired by my sketches last month.  I’m happy to say I have a little coffee-loving treat for one special coffee loving friend who created a card for EACH sketch last month!!!  Sandi Pressley, I loved each one of your creations and appreciate that you took time to create projects inspired by each sketch in August.  I’ll reach out to you on the FB group page so that I can send you your “prize”.
And WOO HOO!!!  We’re excited to announce the upcoming Fall Coffee Lovers Bloghop! The hop will run from September 23-30 and we welcome YOU to join the fun!  The hop will begin at 6:00 AM Pacific time and we encourage you to post your coffee/tea/cocoa loving cards and projects!  As with every fabulous Coffee Lovers Hop, generous sponsors and blog hop participants will be contributing amazing prizes so you won’t want to miss out on the fun!