Thursday, December 31, 2015

It'll be alright...

Hello Journey friends,

Today I'm sharing a few cards I created after a fellow coach reached out to me (and other coaches) in hopes to send some well wishes for a friend...I had a mission to create a card that would help her friend keep her spirits up during some trying times.  

I had plans of using the Cupcake Liner Die this week and this card was the perfect opportunity to pull it out and experiment.  I love using this die in unexpected and different ways and using it on a card gives me a chance to do that.  The scallop and the arch on this die allow for the perfect layout design on a card.  
After stamping the diecut, I softened up the ink a bit with some Butter Cream ink.  I mounted this diecut onto some Yummy and Delicious Printed paper that I had mounted onto a brown panel and Butter Cream card base.  I also added the sentiment by using the Circle and Scalloped circle punches.  Fussy cutting the stamped leaves and adding the ribbon/twine bow was next. The final touch was adding some sparkle dust on some of the "berries".  
Stamping all over the ButterCream cardstock diecut allowed me to add some pattern to the card and a little feminine touch...Perfect for this card.
I don't often go all out on the insides of my cards, but I felt this card needed just as much a beautiful inside as the outside...I hope the recipient "gets that message".
Since I had half of the stamped diecut left, I decided to make another card with my leftovers.  This time, I selected some gold stripe vellum (LOOOOVVVEEE IT) mounted on Butter Cream panel and a Bubblegum Pink card base.
So there you have it...Two cards created with one cupcake diecut!  I like how both cards turned out and I hope the recipient finds her card a comfort during her trying times.  

You can purchase any of the FSJ items by heading to my shop HERE or click on the items below:   

Stamp Set:  Lead Me
Inks:  Bubble Gum, Butter Cream, Cocoa Powder, River Stone, Sweet Pear, Lemon Grass
Papers: Bubble Gum, Butter Cream, Cocoa Powder, Yummy Prints, Vellum Designer Prints
Dies and Punches:  1 1/2 inch Circle Punch, 1 3/4 inch Scalloped Circle Punch, Cupcake Liner
Ribbon/Twine:  Cocoa Powder Gingham, Natural Thread
Embellishing Elements:  Hearts and Stars Wooden Buttons, Sparkle Dust
Glues and Adhesives:  Small Foam Squares, Journey Craft GlueJourney Glaze
Non FSJ Items:  Seam Binding

I'll be back again tomorrow for the Season's Givings Blog Hop...It's HUGE...Won't you stop back tomorrow to see what I've created and what I'll be GIVING away to one special blog reader...

Happy New Year!

Sunday, December 20, 2015

Christmas Wishes...

Hello stamping friends,

Sharing another Christmas card I created for this year's batch.  Hope you enjoy.  :)
For this card,  I started off with using some FSJourney Cool Pool Color Splash  and a Round Paint Brush to create a watercolored effect on watercolor paper.  It's my most favorite method with this medium and allows me to create some lovely backgrounds!  I just dipped my paintbrush into the bottle, applied it to my paper and added some water to spread it around.  Easy, peasy!

After that, I added some Journey Modeling Paste by spreading it over some paper spackling tape (I have a huge roll from Home Depot or Lowes).  I distressed the paper up a bit with some silver Rub-n-Buff too. That gave it a bit more vintage look.  When rubbed with a cloth, the Rub-n-Buff creates a beautiful metallic shine along the edges and surfaces of any medium.  It's awesome and comes in several different colors.

Next, I stamped the deer from Winter Holiday Bundle onto Whip Cream cardstock using some Clear Embossing Ink and White Embossing Powder.  I also stamped the trees with Lemon Grass Ink and distressed with a bit of Whip Cream ink to soften it up.  I then diecut it using the coordinating dies in the stamp/die bundle. While the diecut was still in the die, I burnished the inside edges a bit with my Bloom Tool so they would be more rounded when removed. Next came the assmeblage of a variety of papers and embellishments.

I cut up a piece of printed paper from the Going Places collection and added some silvery ric-rac and some antique white seam binding.  The little colored chocolate wrappers (found in the decorator aisle at Joanne's) are some of my most favorite embellishments to work with. I find they add just the right amount of shine to my cards and help create the dimension and collage effect I so love.  I also used a store-bought paper doily as my FSJ Doily Die was hiding from me.

When done with the front panel, I opted for a basic white card base.  I loved all the white in the card and didn't want a background color to distract from it.  I don't often create "white cards" so I made sure to have a lot of restraint in mounting.  A few little Pearls finished it off.

Wednesday, December 16, 2015

Advent Calendar Extravaganza-With Taheerah Atchia'

ETA:  WINNERS ANNOUNCED!!! SCROLL DOWN TO BOTTOM TO SEE WINNERS!  
Advent Calendar Extravaganza is -THEEEE- festive event of the season! This ‘hop with a twist’ was dreamed up by Taheerah Atchia and features surprise destinations each day! Joining in the fun with Taheerah are over 60 special guests (Including ME)- each serving up some fantastic Christmas inspiration! Just like an Advent Calendar, you’ll never know where you’re going to be visiting next until you ‘open the door’!

And that’s not all! With 25 *amazing* sponsors taking part as well, your crafty wish list is bound to get a boost with a chance to win a prize EVERY SINGLE DAY!!


Join in the fun every day at taheerah-atchia.com to see what special surprises wait behind the door!
***   ***   ***
I so enjoyed making this collection of cards!    I was able to use my Journey Color Splash as a wash on watercolor paper over some embossed snowflakes- so fun experimenting with this Splash.  I used a few colors for this project:  Shimmer Gold Splash, Blue Lagoon Splash and Cool Pool Splash!  It works fabulously as a wash!!!

After the ink dried, I removed the embossing layer using my heat gun and a cloth.  I distressed the whole paper with Whip Cream True Fusion Ink .  Next, I flicked some Silver Silk onto the watercolored background, added some Platinum Liquid Pearls and I was ready to attach it to some Silver striped vellum.  This is my most FAVORITE VELLUM ever!!! It still needed one more stamped element to "ground" the image so I stamped the lacy border with River Stone True Fusion Ink  then fussy cut/distressed and pop-dotted it up on the edge.

Applying my image to Oatmeal Cookie and Whip Cream cardstock was next.  I used a Blue Lagoon (MY NEW FAVORITE COLOR) card base to mount my completed front panel.
They yummy Tinsel Trim and the freebie star embellishments were the perfect embellishing touch. I sewed an aqua sequin and a pearlescent seed bead onto the shimmery fabric star. To complete the triad of embellies, I added a little dew drop.  :)
***(I'll be contributing a few prizes as well!  Since FSJ is only available in the US through an FSJ Coach like me right now,  I would love to award the prize to one USA winner, one Canada winner, and one "over-the-pond" reader!  The winners will receive a pack of the silver shimmer puffy stars, a pack of the wooden stars and a collection of papers I used in this project.  If you are READING this and NOT JUST PICTURE WALKING THIS POST and are interested in the prize stated above, please add this comment saying "FSJ Newbie" and your name will be placed in my drawing.  I'll accept comments posted up until December 31.  I'll announce a winner on January 1.)***

It's not a party without a prize!  And with prizes every single day, there are several chances to win!!!  Today's prize is generously supplied by Dee's Artsy Impressions (Click on the link to be directed to her blog so you can see her yummy stamps!!!). We know you'll definitely want to get your hands on this sweet treat!  How?  Simply leave a comment here and head over to taheerah-atchia.com and leave a comment there to double your chances.  Don't forget to grab the other prize destination links and leave them some love too.  Every comment gets you a chance to win, so comment like crazy!!!

Remember:  You'll improve your chances of winning with EVERY comment posted.  You have until 7am EST on Thursday 31st December to leave all your comments! This Advent Calendar Extravaganza will run from Dec. 1-25 so make sure to visit Taheerah's blog every day to see what's behind that door!  

All comments will be accepted until December 31 and announcements of all winners will be posted the following week.  Good luck and MERRY CHRISTMAS!!!

WINNERS WINNERS!  The following names were randomly drawn to receive a prize package from me. Please contact me soon so I can send my package out to you!  
USA:  Rebecca Yahrling
Canada:  KT Fit Kitty
UK:  Lynn Hardy

Sunday, December 13, 2015

Merry Sparkly Christmas!

Hello there stamping friends!  

Today I'm sharing another Christmas creation I made for my stack of Christmas Wishes this year. I've been creating TWO of each style of Christmas card I make lately, and I'm glad I'll have a personal copy.  I think this one is one of my most favorite this year!

I got a big box of FSJ stamps, dies, and goodies in the mail the other day and I was so excited to play this weekend.  I used a couple of the sets here.  Well, Three sets here!  Winter Season (love the elegance), Modern Tags (oops- I need to get the dies next- fussy cut it this time!) and You Deerly (love the deer in particular)
The background was stamped with Cranberry Bliss ink.  The sentiment panel was stamped onto ButterCream cardstock.  The deer and sentiment panel were stamped with Cocoa Powder ink.  I distressed everything with ButterCream ink.  I colored the sentiment with a few Copic markers too.  The whole cardfront (Pool Play and Cocoa Powder) was attached to a Cocoa Powder card base.  
As you take a closer peek, you'll see that I attached some Candy Apple satin ribbon, a red sparkly snowflake (purchased at Walmart) and a little jingle bell (also from Walmart) with some Journey Natural Twine.  I also added some Journey glaze over the sentiment to give a bit of shine.

Saturday, December 12, 2015

Cozy Wishes and...Coffee...


Hello there Stamping Friends!

Today I'm joining the BILLIONS ;) of stampers worldwide as we hop, hop, hop on the Holiday Coffee Lovers Hop.  It's such a fun and inspirational hop and I look forward to visiting each and every blog (It takes a DAYS, but it's worth it!) to be inspired and filled with cafe love...and maybe a few teas here and there too.

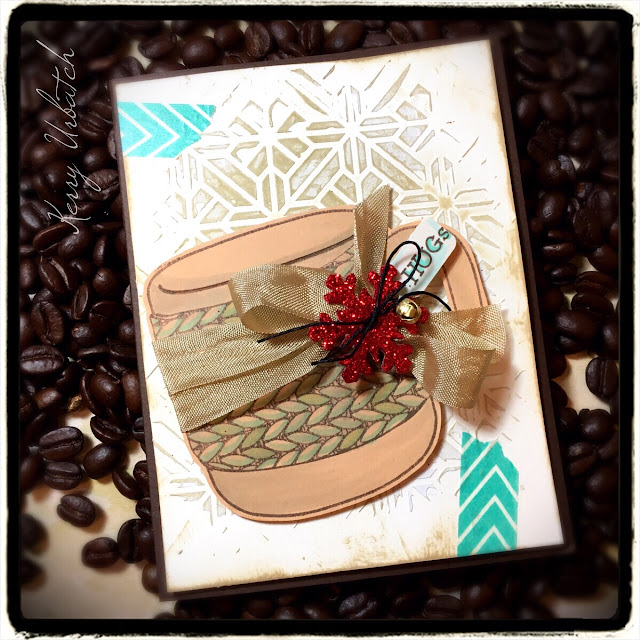
I decided to play along a few times and this is my first group of cards.  This is a new Kit of the Month set called Cozy Wishes by Fun Stampers Journey.  I like the little knitted cozy around the mug and it was easy to add a bit of Copic coloring to the knit pattern.  The mug was attached to a background I created with one of my new FSJ stencils and some modeling paste.  I just received these supplies in the mail the other day and was ITCHING to play this weekend!  WOO!   A little distressing over the background after it was dry and it made the stencil pattern come to life.  Added a few strips of FSJ washi tape, a jingle bell, a red sparkly star from Walmart and a little stamped tag finish it off!
Isn't it yummy?!?!
I turned this mug into a gift card holder.  Although the first card doesn't show a gift card, it too will hold a gift card and will be sent to someone special this Christmas.  On this second card, I changed the color of the background distressing and added a little Rudolph image from another FSJ set I love. 
 Some Stickles sparkle was all it needed to make it "fancy".  LOL
And there you have it!  My first contribution to the hop.  I'll be back again tomorrow (or Tuesday) to add one more project.  I know you'll love it.   And....to one lucky blog READER, there will be a sneaky coffee themed prize...Let's see who will read and not just preview/scan/picture walk and comment (I'm an elementary school teacher and I have quite a bit of experience with "picture walks") ha ha ha. 

Want to join the hop?  You have until Dec. 18 to participate.  Just create a card with the coffee/tea theme and link-up your post with the blog HERE

All items used (except the tiny jingle bell, seam binding, Walmart Sparkly snowflake, and the Red Stickles on Rudolph's nose) on these cards are Fun Stampers Journey products and can be purchased through a coach (I'm a coach!) via my webstore.  If you're interested in purchasing this exclusive Kit of the Month, feel free to contact me, I'd be happy to help you.  

Tuesday, December 1, 2015

Cozy Wishes...

Hello Journey Friends!

Welcome to December!  WOO HOO.  I'm getting excited about the colder weather and the possibility for SNOW.  Yes, I LOVE snow!  It's the perfect partner to toasty PJ's and tasty hot drinks.  This month, FSJ is releasing the newest Kit of The Month that is PERFECT for winter, coffee lovers, hot chocolate lovers, tea lovers, etc.

Introducing:  Cozy Wishes!
My kit will be arriving in just a few more days and I can't wait to get started creating.  I can't wait to decorate the mug with lots of festive images.  WAHOO!!!

Interested in joining the KOTM club with me?  Here are the details:

Thursday, November 12, 2015

Big Partnership Announcement!

Oh my goodness!  I'm so excited today!  This week has become an amazing week of awesome news and I'm so excited to share a little bit of it with you today.  Richard Garay announced today that FSJ has formed a partnership with Webster's Pages to create an exclusive line of Planners and planning products for FSJ.  I am SO excited!!!  Make sure you head over to Richard's blog because he's offering a chance at a few FUN stamp sets...All you have to do is comment, like and share.  (You can also check him out on Instagram and Twitter!)  ;)

Obviously, you can see from the photos that I ALREADY have a Color Crush planner and have been having a ball trying to keep myself organized while also having a fun stampy time embellishing my pages.  

When I heard the news, I was thrilled!  I drove home this evening ready to add more fun to my planner (I had already done my November cover page and hadn't shared it yet.  Take a peek below:  
I hadn't finished embellishing my planner page for this week so I climbed upstairs to my crappy room and got to work.  I guess I was a bit over-excited because I just now noticed that I used a 10- instead of an 11 for the date.  OOPS!  Don't you just hate that?!?  I guess I'll be heading back to my crappy room to do a little fixin' later!
I've been working on a Bible reading program and my planner is a great place to reflect on the passages and document each reading.  It's a constant reminder to keep the faith!  :)  
I also worked on creating some fun little planner clips.  I used Fimo clay (baked with my heat gun) and FSJ acrylic paints to color the disks.  I burnished the colored disks with some Oatmeal cookie ink and rubbed off the paint on the flowers to give it a rustic "dirty" look.  I also added a bit of Journey Glaze and Sparkle Dust. 

Saturday, November 7, 2015

Merry and Bright


Hello Journey friends, 
Today I'm sharing the start of my Christmas card collection for this year.  Today I made a couple of these cards while playing around with the sketch challenge at Creative Blooms.  Each month, I host a sketch challenge and a color challenge and I hope that other stampers will join the fun.  I don't typically use a lot of patterned paper (I tend to hoard that because I don't want to cut it up) and I usually create my own designed/embellished papers.  
In creating this patterned paper, I used some pool play cardstock as my base.  I placed some of the snowflake elements (iridescent acetate snowflakes) onto my gelli plate then spread Journey Gesso over that.  I removed the snowflakes (and washed them in warm water) then applied the gelli plate to my cardstock.  After that, I spritzed the paper with cool pool splash and Shimmer Gold Splash. That's IT!  
For the tree (I used the Nature Trees) I applied some Copic dots for lights and some golden Liquid Pearls for dimension.  I mounted the card panel onto Butter Cream cardstock and then onto an Oatmeal Cookie cardstock base.  I stamped the sentiment with the new Tag Elements ATS.  
Look at that yummy goodeness!  Love the shimmer.  Because I inked up a whole A2 panel, I was able to cut it in half and use it on two cards!  WOO HOO!

Hope you enjoyed this project. I'll probably Periscope a tutorial sometime later in the week.  Stay tuned and watch my Instagram and Facebook for a heads up!

Wednesday, November 4, 2015

Happy Birthday!

Hello there Journey friends,

Today I'm sharing a card I created for one of my sisters.  It's her birthday on November 3 and I thought I'd send her a special care package with this card.  I hope she enjoys it.  I used the Happy Birthday stamp I received this year from Richard Garay and Team FSJ for my birthday this month.  
Her favorite color is purple so I used a lot of purple in this card.  It's not a color I'm drawn to so to make it palatable to me, I add red and blues.  I think it makes it a bit more "sweet" when red is added. LOL...  I used el-cheapo watercolors for the background and some watercolor paper (OH I WISH FSJ would offer watercolor paper).  
I'm working on destashing my big collection of wood veneer stars (I have TONS), so I'm using them a lot.  I think they're going to make a HUGE appearance on Christmas Cards this year!  SOOO BE PREPARED!  
Some say they love to see the Copic colors I use in my creations so I've started taking some pictures of the whole lot.  I'm happy with the picture quality of my new Iphone so it's become quite easy to just grab the bunch to take a quick shot before putting them away.

Monday, November 2, 2015

Brownie Bombs are the BOMB

 Hey Journey friends,

Halloween is over and I can share the yummy treats I made to share with friends.  They were a big tasty hit!  I had a few left over so I secretly mailed some to my sister for her birthday November 3...HEE HEE...A little after-Halloween trick and treat!
I loved being able to use the spooky set from Fun Stampers Journey to add a more festive feel to these treats.  I have some neon colored Copics that I very rarely use and they came in handy for the eyeballs in a jar.
 To give a bit more gore to the treat, I splattered some Cranberry Bliss Silk onto the skull images.  This Silk is more blood-like than shimmery, so it worked perfectly.
Of course I had to sample some so you could see the inside of the bomb.  MMMMM...Brownies and chocolate chip cookie dough.  So delish.
The wrappers and the paper straws were purchased in the dollar spot at Target.  So perfect!

If you're interested in the Brownie Bomb recipe I used, it's quite simple:

Each bomb contains 2 mini brownies (from Wal-mart)
Brownies were stacked between a small ball of cookie dough.
The sticks were carefully poked through the brownie stack.
The brownie "pop" was dipped in melted chocolate chips.

I think next time I try Brownie Bombs, I'll use Peanut Butter and JELLY!

Wednesday, October 28, 2015

Happy Halloween

I'm not really looking forward to Halloween.  I just don't get into it that much anymore.  I guess you can say that I've become an old grumpy lady.  LOL...

Anyway, I decided to play with some stamps that are "Halloween-ie" because I thought they were cute- and because I liked the crow (or is it a raven?).  When I discovered I could combine a halloween making card with a collage challenge, I got a teeny bit excited.  I'm not lying.

I really love how this card turned out.  I loved the concept so much that I decided to make TWO...Yep, TWO...and I mailed them both out on Thursday.  Yeah, I'm sure they'll arrive AFTER Halloween is over but oh well, I guess that's a little TRICK and a TREAT.  :)
 So there...Some yummy blue splatters from my watercolor inks, some spattering of golden embossing powder for texture and shine, some golden liquid pearls, a little bit of machine stitching, some glossy beady eyes on that bird and a cute little bow with a button because a "Kerry card" is not complete without ribbon!  :)
 Oh so delish...
Zigs and zags complete the collage look!  LP

Have a spooky Halloween.  I'll be hiding somewhere trying to evade the treaters.

Missing You...

I'm feeling a bit lonesome nowadays...My parents moved away and I find myself wanting to head over to their house just for a visit...That doesn't work so well because there is nobody there anymore...I'm looking forward to the holidays when I can take a trip to visit with and SEE them... Until then, I have to rely on visiting on the phone, sending snail mail and just keeping myself busy during no-work days.  

I created this card on Sunday...my Scraps Day.  On Sundays, I spend time up in my craft room listening to a local Praise music radio station and using up the scraps on my crafting table.  

For this card, I wanted to create a water colored background.  I pulled my cheap-o palette of inks and went to town with the blues and the greens.  I decided to overstamp some Elegant Borders background stamps on the edge and use the Postage Stamp ATS too.  Using Huckleberry Fusion ink was the perfect match.  I also grabbed a scrap of patterned cardstock (the back is an orange color) and crinkled it up before applying it to the card.  Since some orange was peeking through, I thought I'd give some added orange to the matting so that the patterned paper would coordinate more completely with the whole design.  
Diecutting, shaping and heat embossing the flower (Spring Filled Bundle) was the next step.  I first adhered some tissue paper to the green cardstock before diecutting so that the green coloring would be more muted.  After diecutting, I applied a splattering of gold and white embossing powder to the petals (and the standard brass brad (from Staples).
I had a few scraps of graph paper and some golden ribbon so I used that too.  Gold goes sooo well with this rich green and blue, don't you think?!  I finished the card off with some splattering of gold silk and that was it!  

beBrave...Some more!


Yummy collage!  I love making beautiful messes!  Here are two cards I created for the Be Brave card drive with FSJ.  I pulled out my retired Bootprint ATS stamp and sentiment, The Hope ATS, The Honeycomb ATS (look closely) some freebie wooden stars, The Tag die, some scraps from silver stripe vellum, some scraps from the Journey Girl wrapping paper, some twine, some pearls, some splashes, silks, pearls and the whole ball of wax!  WOO!  
 Here's the second  (well actually the first) verson...I think it's my favorite...I used all of the same materials except added some taupe seam binding (ruffle taped to the back) and did a little handstitching.
Take a peek at the heart...It's dipped in layers and layers of clear embossing powder.  YUM, texture, fun!

beBrave

This month I've been contributing cards to several different card drives for Cancer Awareness Month.  I created the following cards for the beBrave drive at Fun Stampers Journey:
I played around with my new favorite stencil Bloom Wall ($6.95) and some cheap white Apple Barrel acrylic paint and added some reinkers Sweet Berry ($5.95) and Beach Breeze ($5.95) and to change the color.  I wanted the ink underneath to be really messy so I just applied some paint to the stencil and slapped it on the Sweet Berry paper over and over...After applying the messy stenciling, I overlayed the "neat" stenciling on top with a heavy application of white paint and one of the plastic panels from the HOPE ATS stamp ($7.95) I used acted as the "spatula".  
I'm one for layers upon layers of cardstock as I create my cards, so it was fun to keep assembling the layers here. I also offset the ribbon using the pierced oval diecut.  
Adding a little charm tied to the satin ribbon bow just finished it off.  If you look close enough, you can see that the pink ribbon was heat embossed with over three layers of clear embossing powder. YUM!
The second card was created with the leftovers from the card above.  I didn't want to toss the extra strip of stenciled pink paper so I decided to create a "strippy card" with other scraps on my workdesk. 
 As you can see, I splattered, spritzed, tore, and stamped.  SOOO FUN!  PS...I had to use a Mat knife to cut the inside of the ribbon...I think FSJ needs to come out with a coordinating die for this stamp (PLEASE!).
Stop back again for a few more cards I created for this special card drive.