Sunday, July 31, 2016

Hello Sunshine!

Hello there Journey Friends!

I'm thrilled to pop in today and share a card I created for the Can You Case It? challenge this week. It's a color challenge and I just LOVED the color combo so I had to head to my stamping room and play!
I started out by creating the stamped panel. I used FSJ's new Polkadot Wall stencil. It's a large stencil that works perfectly covering larger areas. I used my finger to apply Pineapple Smoothie ink to the dots. After they were applied, I stamped the Deco Dots ATS all over the image using Butter Cream ink. Next, I applied Butter Cream ink to the solid floral in the Poppy Days set and overstamped that with the lined images using River Stone ink.  
To finish the panel off, I applied a few splatters of Silver Silk, cut the panel in half (so I could make two cards), mounted the panel onto River Stone cardstock, wrapped some Black Journey Twine around it and attached the yellow acrylic bloom (Bloom Benefit with $50.00 purchase!). I also added a circle tag from the Tag This cartridge that I punched using my punch system and then stamped it with the "hello" sentiment from the Tag Elements ATS set.  
After the stamped panels were assembled, I set them aside and started working on my background layer. I used my sewing machine to stitch some meandering lines then attached it to the Summer Days card base. I placed a slightly larger piece of silver polka-dot vellum from Vellum Designer Prints over that to tone down the stitching lines. Mounting the stamped panel was next. I elected to add some foam squares to this panel to add extra dimension.
I hope you enjoyed reading about and seeing my creation. I loved this color combo and can't wait to see what YOU create. Can YOU case it??? Give it a try! See you again soon!
Friday, July 29, 2016

Create with Me LIVE! Tag You're It!

Hey Journey friends!  Today I created an adorable birthday card and tag set LIVE on my Facebook Business page.  If you're not following me there, you might enjoy visiting my page to catch me playing LIVE!  Check it out HERE

I wanted to focus on the Tag You're It! Challenge #52 (create a card/tag inspired by Amy T's yummy creation.)  I love the simplicity of the layout and the flexibility to do whatever I want on the card!  :)

I played around with my new FSJ Color Splash watercolor pencils and a few yummy stamp sets.
I just love the soft watercolor effect created on this tag and loved adding the contrasting pattern on the background.  Embossing is a favorite technique on background paper because I LOVE the yummy shine and dimension it allows.
Isn't it just yummy?  It's a perfectly playful card...
A little watercolor splatter here and there to help add dimension to this soft tag.  As mentioned in my Live video, I enjoy creating coordinating sets to give away as gifts so this was the perfect opportunity to create a tag decoration for a surprise box...nothing inside right now but it will have some treasure selected especially for the recipient.
If you're interested in purchasing any of the products featured today (and earn benefits too), you can join my virtual party!  All party benefits apply and anyone who places an order by Sunday (midnight), will receive a special treat from me.

Products Used:
Stamp Set:  Blown Up, Yummy Wishes
Embellishments:  Candy Minis
Stationery:  Treat Box

Sunday, July 24, 2016

Journaling Galatians 5:13-15...

Today's Bible verse that displayed on my phone comes from Galatians 5 verses 13-15.  The verse hit home with me and I knew it would become the journaling project of the day.  
I've been avoiding the news media for several weeks now because all it seems to present is sadness, anger, unrest and EVIL.  I just can't take it...so I turn everything off.  These verses really hit me and made me want to shout them from the rooftops, from my car, from the school hallway...heck...even the bathroom!  Anywhere my voice will travel, I want to shout these verses!  
I wondered how I could present the verses in artistic form in my Art Bible and decided that I should just immerse myself in creating...Love...just do what I love...That's what it's about really!  So I grabbed some of my new HUGE stencils and started adding some clear embossing ink...then I added clear and white embossing powders.  After that, I added some watercolor wash using my new FSJ watercolors.  I am REALLY LOVING these pencils.  They blend perfectly and are so easy to use.  
After adding the watercolor wash, I moved on to stamping the borders with black Versafine Onyx ink and applied some Journey Gold and Journey Silver Embossing powders.  These metallic powders are the most shiny metallic I've seen and they gave my page the perfect LOVE factor I was looking for.
Of course, no journaling page of mine would be complete without pencil journaling.  I journaled over the embossed dots- which in hindsight probably should have been done first...but oh well...go with the flow...On page left, I added some layering embellishments, stamped images and some loops of taupe thread.  For some reason, I tend to work on page right first, then move over to page left...  I've also noticed that most of my favorite verses are found on page right...Interesting, I think.  
If you look closely at this page, you'll see that I used a leaf stencil.  I stenciled the leaf first and added clear embossing powder...I wish I had added white powder- but I really don't like to cover the text on my bible...so I guess, it's ok.  I also had an oops- and that's why you see the "Lead Me" sentiment on the page... My ink pad tipped over and rubbed against the page.  I tried turning it into an "on purpose" by adding some silver embossing powder and some additional black "ink pad marks" but I'm not sure it hides the "oops"!  
A little sparkle on the watercolored/stamped flowers gave them dimension and texture...So much of what I love.
And yes, gotta add some of my yummy candy dots...they were the perfect color for this spread!  :)

FSJ Products Used:
Vellum (punched with our Punch Tool and a scalloped circle)

Non FSJ Products Used:  
Crossway Journaling Bible
Wilton Candy wrappers
Pencil
Graph paper
kraft cardstock
Taupe thread

Chin-Chin...Piggie Portrait!


It all started out with my love affair with this adorable little piggie set!  When I first laid eyes on it in the new FSJ inspiration book at convention, I KNEW, absolutely 100% that it would be one of the first sets on my MUST HAVE LIST!  I love these little guys!  They are too stinkin' adorable and yeah, they're perfect for this teacher right here!  I could imagine all kinds of fun scenes and adventures...without that Big Bad Wolf..Hey wait!  Where is he???  OH man, we need a wolf and the houses too!  I'd better suggest that to the FSJ team!  

So I waited...and I waited...and I waited for my stamps sets to come in and when they finally did, I ran right up to my craft room and started coloring!  
I love the way my Copic markers create crisp and vibrant colors onto stamped images so I decided to use them to color my piggie.  He was just so fun to color!  After coloring him, I fussy cut him out and added some foam squares onto the back and set him aside so I could think...and ponder what to do with him.  

Then today...It hit me!  WAHOO!!! My watercolor pencils showed up in my mailbox last night and it would be the PERFECT opportunity to play with them!  I ran back up to my craft room and got to work.  MMMM...Sooo yummy.  The Color Splash watercolor pencils are AHHHH MAZING!  Yes, I'm in love...again!  
I just had so much fun creating this scene for my little piggie.   The colored panel is 5x5 and the perfect size to mount on a card...or so I planned...He had other plans though.  He wanted to be FRAMED!  So I added a watercolor wash to the 8x8 background paper, stamped the flannel background, embossed that with white embossing powder, added some more watercolor and mounted the image onto the panel.  It fit perfectly in the frame!
You can BARELY make it out but his eyes and toenails are glossy!  Doodling is fun too, so I added a few doodled pieces of grass and weeds with my Micron Multiliner Pen, then added some Pineapple Smoothie, Sweet Berry and Butter Cream acrylic paint for the "flowers".
I created the clouds after making the first swipes with the watercolors.  I dabbed Clear Pigment Ink onto the paper with my fingers (Can you find my fingerprints??) then applied Journey White Embossing Powder, then heat set it.  After that, I applied another layer of watercolor wash over that to allow more color to hit the underside of the clouds and the crevices.

So there you have it...My ultimate favorite piggie portrait!  What do you think?  Don't you just love this little piggie set?  How about the watercolor pencils???  You can get everything featured in this post (except for the Shadowbox frame I got at WalMart) in my shop.  I've attached links to the products used, so have fun shopping!

FSJ Products Featured:  

Non FSJ supplies:
Micron Black Ink Pen
Copic Markers (colors coming soon)
8x8 Memory Box Frame (Wal Mart)

Friday, July 15, 2016

Exciting Announcement!


Hello Journey Friends!  I've got a SUPER Exciting announcement that I can share today and I'm ready to spill the beans...Coffee Beans, that is!  WOO!  

I'm honored to have been asked to join the Coffee Loving Cardmakers Design Team.  I'm overjoyed to join such a talented group of designers and can't wait to share my love of coffee/tea and hot chocolate with you!  When you take a look at the designers I'll be teaming with, you'll understand why I'm so excited!  They are ROCK STAR stampers and crafters and I'm just THRILLED to work alongside them.  
Kerry Urbatch <------That's ME!!!
There are a few more to be announced but you'll have to check back later!

I'm excited that I will also be able to share my love for design using my Fun Stampers Journey Products too!  Throughout the next several months, I'll be sharing coffee loving projects HERE and on my "all stamps are fabulous" blog HERE.  You'll also see me posting on the Coffee Loving Cardmakers blog so if you're not  a follower, make sure to join the fun! 

Now... A post HERE won't be complete without a fun inky project right?  Well, to kick off my fun coffee-loving adventures on the CLC blog team, I'm sharing something from our new catalog...Another tres chic coffee set!  Take a peek:  
One thing I LOVE about this new set "Le Cafe" is that it is not only meant for the COFFEE lover in me but it's also hittin' that yummy CARB-LOVING spot!  OHHH yeah!  Yum!  I love the combo and it's mighty tasty to work with...In fact, so tasty I had to go make some peanut butter toast when I was done making this card!  TRUE STORY!  Sooo...Let me share a bit about my process in creating this card.  
I started out by stamping the baguettes with Hazelnut Blend ink onto Oatmeal Cookie cardstock.  I used a bit of Hazelnut Blend PanPastel to distress the paper afterwards.  I then set out to color the images with Prismacolor pencils.  I loved adding a bit of white colored pencil to make the images pop.  After coloring, I attached a piece of black and white stripe patterned paper (Retired) that was also distressed with Hazelnut Blend PanPastel.  I attached some Candy Apple ribbon and added a bow of natural thread to finish the card base off.  
Next, I moved on to stamping the steamy cup of coffee onto Whip Cream cardstock using Hazelnut Blend ink.  I added a bit of color with PanPastel and with Prismacolor Pencils.  After coloring, I cut the image out with my awesome Detail Pro Shears and positioned it by the bow using small foam squares.

To finish the card off, I decided to add a layer of Cranberry Bliss cardstock and a torn piece of paper bag (just to give a nod to the baguette wrapper) and attached them in a "wonky stack" onto a Whip Cream Base.  

Thanks for stopping by to share my excitement!  I can't wait to join the Coffee Loving Cardmakers blog team this term!  Make sure to follow the happenings daily...and make sure to brew yourself a cuppa joe too!  :)  

Wednesday, July 6, 2016

Dream It! July's Bloom Box is HERE!

Hello Journey Friends!  I'm so excited that my July Bloom Box is here!  I tore open the box as soon as it arrived and headed right to my room to play.  Although this kit includes supplies to make the four cards featured above, I always seem to diverge from the "plan" and explore the set for myself.  Joining the Bloom Box Club with me gives you the opportunity to receive FOUR additional card kit projects...Just sign up for the monthly Bloom Boxes and I'll send you FOUR additonal card kits to create some amazing new designs.  That's a total of 8 kitted projects, a complete stamp set, an inspiration and instruction booklet with new techniques and products featured and SOOO much FUN!  Join the club today! :)
I started off with adding some FSJ acrylic ink to my Gelli Plate.  After rubbing it in a bit with my finger, I applied the watercolor paper to lift the ink off the Gelli Plate.  After that, I added some additional ink to the plate and used a pin to scribble a few lines into the ink for texture and movement.  Did you know that Fun Stampers Journey carries Acrylic paints?  Oh yes, there are seven yummy colors to choose from right now.  I hope the collection expands to more colors too.  I selected Blue Lagoon and Butter Cream Ink for this background.  
After finishing the background, I sprinkled some Gold Embossing Powder onto the paper in some of the wet locations.  I used my heat gun to set the gold embossing powder and set the panel aside to work on the stamped image.
I stamped the dream catcher with Black Licorice ink then used FSJ reinkers:  Butter Cream, Blue Lagoon, Sweet Pear and some Fusion Blender Solution to color my image.  I also added a little bit of Prismacolor Pencil coloring to add extra detail.  I highlighted some areas with a gray Copic Marker.
After completing the image I andded some gold ribbon and handcut fringe then used my sewing machine to stitch a black line.  I set the background panel onto some Blue Lagoon cardstock, popped it up onto some Butter Cream cardstock (that I stamped Clear Pigment Ink, Gold Embossing Powder to emboss) and mounted the panel onto the cardstock.  I selected an Oatmeal Cookie card base.  With the leftover thread from the machine stitching, I applied it to the back of the dream catcher and popped that image onto the card.  Adding some Sparkle Dust with Journey Glaze here and there added a bit of pop!  

Thanks for popping in today.  Hope you have a fabulous rest of the week!  :)

Monday, July 4, 2016

Freedom...

Hey Journey friends!

It's a yucky, soggy, rainy Fourth of July here in Virginia and I had no plans to go out this year so I decided to head up to my crafty room and search for Freedom in my Bible...There were quite a few verses that refer to Freedom in the Bible, but I felt this one spoke to me the most today:

1 Peter 2:16-17
After finding the perfect verse, I thought about which medium I would use to bring my interpretation to life.  I selected some old dried out Inka-Gold inks by Viva Decor.  I used Lava Red, Cobalt Blue and Silver.  I have quite a collection of inks and coloring tools and hadn't used them in years.  I just had to add a little bit of water to refresh them and they were good to go.  I started out prepping the pages (and the verse) with a little rubbing of  Journey Gel Medium and a light wash of Gesso.  
It may be difficult to see in the photo above but this page spread is quite shimmery!  The Inka-Gold has a metallic finish and when painted onto the paper, it shimmered and shined...too much actually. I had to mute it down a bit with a Gesso wash and applied some extra sheen here and there.  After applying the Inka-Gold, I stamped my star images (From the Star Bright set) using Black Licorice ink.  Blasting it with the heat gun allowed for a quick-dry and I was off to layer some more!  
If you look closely, you can also see that I applied some "fishnet" background (Retired) stamping along with my penciled journaling. After adding a bit of splattering from some Journey Silver Silk and Liquitex Metallic Silver paint, I blopped a few droplets of Journey Glaze onto the panels.  I also added some Red and Silver Stickles here and there.  When all was dry, I rubbed a bit of Silver Rub-n-Buff onto the edges.  When burnished it gives an amazing metallic effect to the edges.  A little wood clip with some fun Candy Apple Statin ribbon and Tinsel Trim Ribbon finished this side off.  
While working on the left side, I also made sure to work on the right side at the same time.  I find doing both sides at the same time gives me a more cohesive look and I can avoid some temptations from my muse to add more or do something different.  After this side was done, I added a little embellishment of Cranberry Bliss cardstock, Fam Bam Clips and some Tinsel Trim Ribbon.  That finished the spread off!  


Christmas Prep in July!

Hey Journey friends!

Today I'm sharing a little itty-bitty Christmas card created using some itty-bitty images.  I'm playing along this week with the Splitcoaststampers Holiday Card Challenge #SCSCCJUL16 and pulled out some oldie-but-goodie stamps for this project.

It's an opportunity for me to fill my Christmas cards basket too.  Love prepping early!
I created this card using just a few stamp sets and supplies:  Holly Jolly set was selected because it's such a tiny set.  The images are small, sweet and perfectly suited for simple and quick cards.  I stamped them onto Whip Cream cardstock using my stamp positioner and Candy Apple ink.  Then I added the sentiment using Black Licorice ink.   I wanted to add a bit of green color to the card without overpowering it, so I used the Houndstooth background (retired) and inked it up with some Clear Pigment Ink.  I used my finger to rub some PanPastels over that...It picks up the color so well!  
After that I added a diecut Border Basics using Limeade Splash cardstock to help accentuate the contrasting images.  Wrapping some Natural thread around the border die and popping it up onto the stamped layer helps give the dimension I always love when creating cards.  A little wooden star helps too.  
I applied the stamped panel to some Cranberry Bliss cardstock (wonky style) and adhered it to a small Oatmeal Cookie card base to finish the card off.

Sunday, July 3, 2016

Happy Fourth of July!

Hoping everyone has a fabulous holiday this weekend!

Stamps Used:  Marquee Type, Be Happy
Inks:  Clear Pigment Ink, Huckleberry Fusion
Embossing Powder:  Journey Gold
Papers:  Huckleberry Fusion, retired b/w stripe, Cranberry Bliss, Pool Play, scraps of asst. colors
Dies:  Fancy Label
Adhesive:  Journey Craft Glue, Small Foam Squares
Embellishment:  Wooden Star (no longer available)

Non FSJ Products
Date stamp
Red Candy foil (Wilton)
Gold Disc (Target)
Small White Gift Bag (Joanne's)

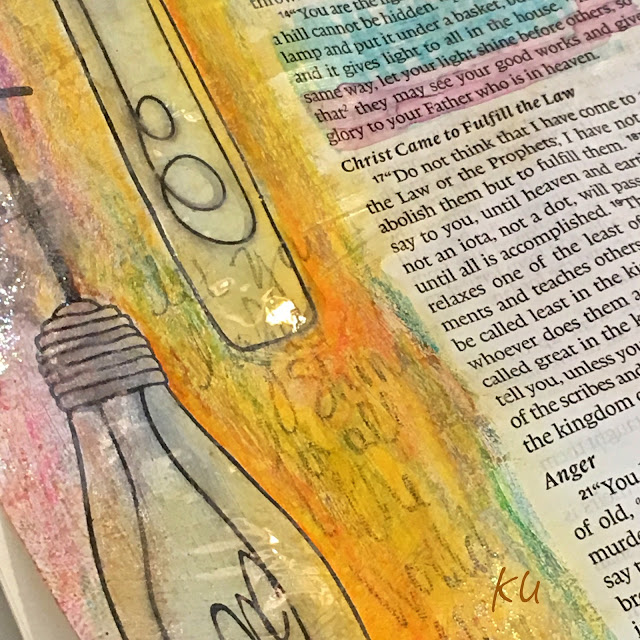
Let Your Light Shine! Matthew 5:14-16

Today I thought I'd work on a little bible journaling.   I was inspired to create this page after thinking about what I needed to remember about my purpose here...It's always a question, always a struggle for me...What is my purpose?  Why am I here???  I think everyone asks those questions from time to time and I'm not alone.  Spending some time reading His word, I searched specifically for the theme: Light...  It didn't take much time for Him to lead me directly to the spot that would sooth my soul, that would help me understand...
Matthew 5:14-16...
I selected some new light bulb stamps from Fun Stampers Journey called Delightful Light.  It's a great set of five various lightbulbs.  I spent some time reading this page spread searching for the answers to my questions...then I set out to explore His word through my hand...
I prepped my pages by rubbing some Gel medium (with my finger) over the journaling edge of the paper and over the scripture I wanted to highlight.  Using the Gel medium seals the paper and protects it from bleed-through on the other side.  After applying Gel Medium, I moved on to adding a bit of Gesso.  The Gesso helped add a bit of "grit" to the surface of the paper and also helps to make my color choices more vibrant.
For this piece, I opted to use PanPastels and Black Licorice Ink for the stamped image.  After stamping the lightbulb images, I applied PanPastels and a bit of Copic markers for shadowing.  I also used some Prismacolor pencils to add more depth with the colors.  After coloring, I did a little journaling with pencil.  I enjoy restating the scripture into my own words, giving myself affirmations and encouraging words.  After that, I highlighted the verse with Copic Markers.  When page left was done, I moved on to page right.  I continued the same process added some Antique Gold Rub-n-Buff here and there and then applied some Journey Glaze over the bulbs to give them some realistic shine and dimension on the page.  I allowed this to dry overnight.
I just love how the Glaze shines on the page.  Sparkle Dust is also applied using a bit of the Gel Medium.  I tend to use a lot of gold and sparkle in my journaled pages.  I just feel they represent and highlight His word perfectly.
Everyday happenings and life events trigger "themes" of study and reflection. When the "theme" is revealed, I read, I pray and I read some more...and eventually, the scripture that explains it all reveals itself.  It's an amazing and therapeutic process...

Non FSJ Items Used:  
Antique Gold Rub-n-Buff
Prismacolor Pencils
Zig Black Pen
Ticonderoga #2 Pencil

Friday, July 1, 2016

They're HERE!!!!

WAHOOO!!!!

It's HERE!  The highly anticipated launch of the 2016-2017 Fun Stampers Journey Inspiration Book and Catalog is HERE!
Take a peek through this catalog and see what all the HYPE has been about.

We think it's an Ahhhhh-Maaaaazing catalog.  Choc full of inspiration and yummy products!  Make sure you have a pen and paper so you can create a wish list!  (Click on the photo to go directly to the online catalog)
If that's not enough, There is also a Journey Holidays MINI inspiration book and catalog:  Check it out here:
After you're done creating your wish list, Why not head over to my store HERE to do a little shopping?  Stop back here to let me know what made the TOP of your list.  I'd love to know.  PS...My order is already packed and on the way!  It should arrive by July 11!  WOOOO HOO!!!